Create Continuity Reports
A Continuity report sets a fixed point in time for you to compare against an approved plan to see how values change and evolve over time.
Continuity Report
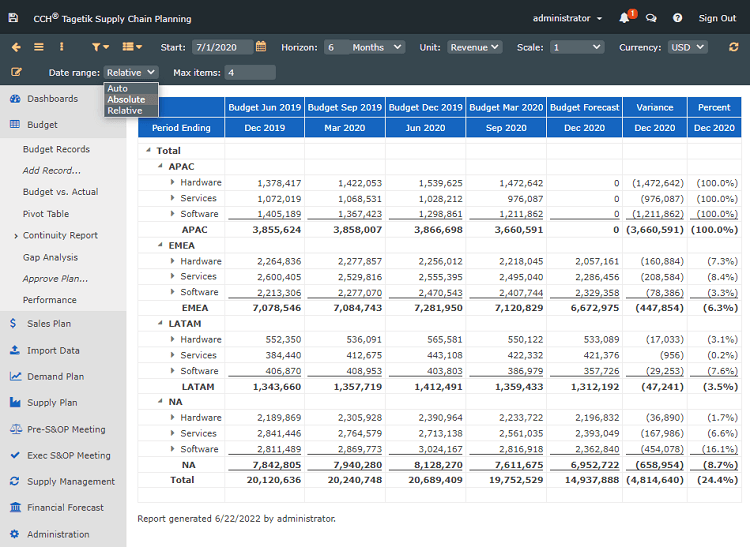
The report column headers indicate the following:
Report Headers
| Header | Description |
|---|---|
| Dates | Indicates the approved plans (or checkpoints) included in the report |
| Variance | Shows how the latest checkpoint compares to a previously approved plan. You can use the toolbar options to customize this information. |
| Percent | Shows the percentage difference between the current data and most recent approved plan |
The Date Range row shows the start date through the Horizon you set in the top toolbar, relative to checkpoints (or approved plans).
See Create and Work with Checkpoints.
See Compare Checkpoints.
See Approve a Plan.
To create a Continuity report
- In the left pane, navigate to an existing Continuity report.
- To specify the information to include in the report, in the toolbar at the top of the page, set the following parameters:
Top Menu Toolbar Options
| Option | Description |
|---|---|
| Start | Type or select a date on which to start your report. |
| Horizon | Type a numeric value for the number of periods for the forecast and select one of the following: - Years - Halves - Quarters - Months - Weeks - Days - 4-4-5 |
| Scale | Select the scale for the values displayed: - % - 1 - 000 - 000,000 Values are always displayed as whole numbers. |
| Currency | Select a currency type for the values. Contact your CCH Tagetik Supply Chain Planning Administrator to add currency types. |
| 3. In the lower toolbar at the top of the page, set the following parameters: |
Toolbar Parameters
| Parameter | Description |
|---|---|
| Date range | - Auto: Starts with the most recent checkpoint and, depending on what you have entered for Max items, pulls in that many checkpoints. For example, if you are in the month of February 2024, the system pulls in the January 2024 checkpoint as the most recent. If you have 4 in the Max items field, the system also pulls in December 2023, November 2023, and October 2023. - Absolute: Uses the same date range and horizon for every checkpoint included in the report. For example, if you are in the month of February 2024 with a 6-month horizon, the system pulls in the forecast for July 2024 (6 months from your current date) on the 2nd row. If you have 4 in the Max items field, the system compares the July month to the previous 4 months (October 2023, November 2023, December 2023, and January 2024) on the first row. - Relative: Sets a horizon for the following x periods. The date range updates corresponding to the time the checkpoint was created. Note: Start date is ignored for a Relative Date Range. For example, if you are in the month of February 2024 and select a 3-month horizon with 4 in the Max items field, the bottom row displays the previous 3 months plus your current month (November 2023, December 2023, January 2024, and February 2024) data. The top row 3 months prior to each month (November 2023 is compared to August 2023; December 2023 is compared to September 2023; January 2024 is compared to October 2023); and February 2024 is compared to November 2023). |
| Max items | Type the number of checkpoints to include in the report. |
4. To refresh the report, in the top toolbar, click the Recalculate icon ( ). ). |
You can drill down to specific records, and create graphs by hovering over the totals.
See Dock Graphs in Reports and Interfaces.
You can also download the interface to an Excel file, or create a view to save it for future use.
See Copy Forecast Data into Other Programs.
See Create and Work with Views.