Compare Forecasts Over Time
Comparing forecasts over time helps you refine your forecasting and improve your decisions. When you open the interface, it compares your current data against the most recently approved plan. If you update your historical data frequently, this monitoring provides a comparison between forecasts and actuals (actual sales, and so on). Also, it shows you how well your forecast for the last period matched your actuals.
Budget vs. Actual Report
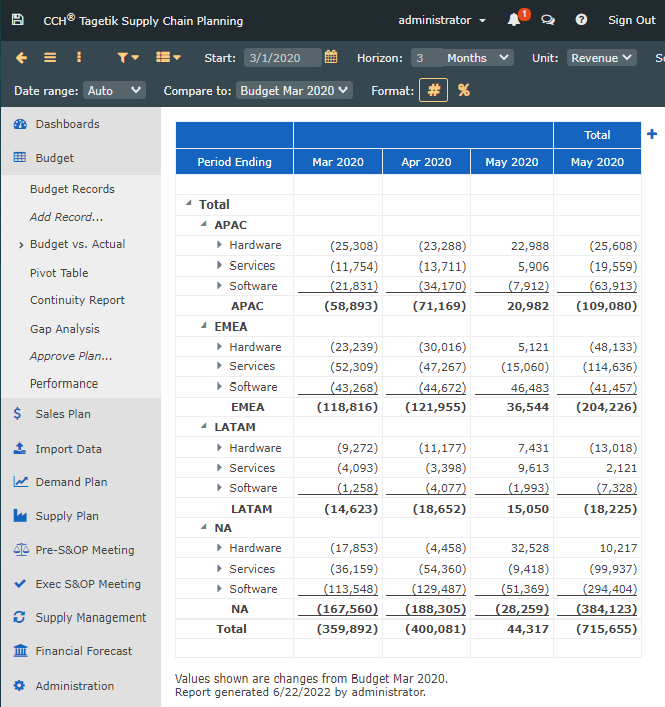
The interface includes only records within the module you are in. From the interface, you can drill down to specific records and click through to see details.
Note: To use this interface, you must have previously created approved plans. The first time you open it, it is blank if there are no approved plans.
See Approve a Plan.
You can customize the columns in this interface, including adding new columns and editing existing columns. You can view different values side by side and build out any report structure you need.
You can also save your report as a view.
See Create and Work with Views.
To work in a custom grid interface
- To specify the information to include in the interface, in the toolbar at the top of the page, set the following options:
Top Menu Toolbar Options
| Option | Description |
|---|---|
| Start | Type or select a date on which to start your report. |
| Horizon | Type a numeric value for the number of periods for the forecast and select one of the following: - Years - Halves - Quarters - Months - Weeks - Days - 4-4-5 |
| Scale | Select the scale for the values displayed: - % - 1 - 000 - 000,000 Values are always displayed as whole numbers. |
| Currency | Select a currency type for the values. Contact your CCH Tagetik Supply Chain Planning Administrator to add currency types. |
| 2. To add or edit a column, do one of the following: |
Column Options
| Option | Description |
|---|---|
| Add a column | To the right of the top of the table, click the + icon. |
| Edit a column | Click the cell you want to edit (any blue cell at the top of the table). |
Edit Column Screen
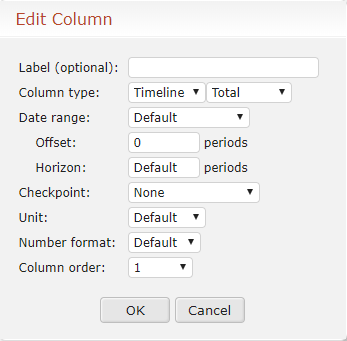 3. In the Add Column or Edit Column screen, do the following:
Top Menu Toolbar Options
| Option | Description |
|---|---|
| Label (optional) | Type a label for the column. If you leave this cell blank, the system determines an appropriate label to use based on the information you select. |
| Column type | In the left list, select one of the following: - Timeline: Time-dependent series of numbers (current forecast, actuals, checkpoints, etc.) - Variance: Show difference between the last two timeline columns - Percent: Show differences between the last two timeline columns in percentages - Formula: Type a formula. For example: C2-C1 is equivalent to Variance. (C2-C1)/C1 is equivalent to Percentage. If expanded, the math between columns is done element by element. Displays according to whether you have selected Total or Expanded. Note: DScript is supported. See the DScript appendices for more information. - Blank: Inserts blank column for readability (groups of columns display together, separated by an empty column.) In the right list, select one of the following: - Total: Show only the final values - Expanded: Show monthly, quarterly, etc., values |
| Date range | Select one of the following: - Default: Uses the settings in the toolbars - Year to Date: Show values beginning at the start of the current fiscal year through the last complete period - Quarter to Date: Show values from the beginning of the current quarter to the last complete period Type the following: - In the Offset text box, type a value to shift the dates based on the period set in the Horizon For example, -12 periods would be 1 year prior if the period is monthly. -4 periods would be the prior year if the period is quarterly. - In the Horizon text box, type the number of periods that override what is set in the toolbar. |
| Checkpoint | Select an existing checkpoint, or select a module and version. Star option: Additional option for version. |
| Unit | Select an option - identical to unit in toolbar. Use Default to keep what is set in toolbar. Otherwise, these override what is set in the toolbar. Below are examples (except Default). May override if you want a pivot table to include multiple unit options. - Default - Units - Revenue - COGS |
| Number format | Percent, currency, etc. |
| Column order | Do one of the following: - Select a number for the order in which you want to see the column (1 being the first column in the report) - Click Delete to remove the column |
| 4. In the lower toolbar at the top of the page, set the following options: |
Report Options
| Option | Description |
|---|---|
| Total by | - All (default) - Properties configured for your instance - Individual |
| Checkpoints | Any checkpoints you have created. |
| Include | - Period ending (default) - All |
| Graph | - Auto (default) - Zero based |
5. To refresh your data, in the top toolbar, click the Recalculate icon ( ). ). |
You can drill down to specific records, and create graphs by hovering over the totals.
See Dock Graphs in Reports and Interfaces.
You can also download the interface to an Excel file, or create a view to save it for future use.
See Copy Forecast Data into Other Programs.
See Create and Work with Views.