Diagnostic labelling
After defining all the labels and setting the rules, it is possible to label all the "taggable" objects available in the document. For this purpose, it is necessary to access the Diagnostic labelling  utility on the Collaborative Office ribbon bar. After clicking on the menu, the system will open the labelling window as shown in the image below.
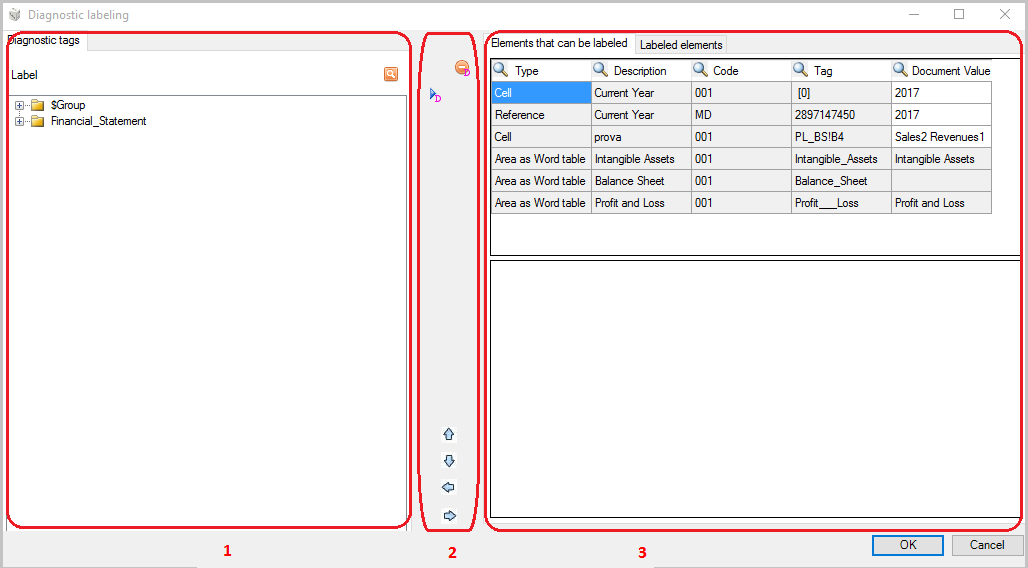
This window shows three areas:
-
(1) - Diagnostic labels. Area containing all the elements that can be used to label the cells available in the definition area. The labelling is done by moving the labels selected in the definition window by the available buttons
-
(2) - Buttons area. Area containing the buttons by which you can manage the elements to move. Specifically:
| Button | Description |
|---|---|
| Item Adds the selected labels to the Document value highlighted in the definition area. - In case of table object, it is possible to tag the value directly on the overview of the object displayed at the bottom | |
| Delete Deletes the tags from the selected cell | |
| Move elements Moves (Up, Down, Right, Left) a group of elements from the cell in which they have been inserted to the desired cell. This is useful especially when it is necessary to move a group of labels because, for example, a new column has been added to the cell |
Each label applied to a cell is represented by the triangle
displayed on the cell itself. If the same label is associated with more cells, it is necessary to define the Master label, namely the one that will be considered during the values diagnostic. In order to set a label as master label you just have to right click on the tagged cell and choose Set Master(the triangle displayed on the cell is red). Moreover, any information on the labels associated with the cell can be displayed inside the tooltip that appears when the user places the cursor of the mouse over the cell.
- (3) - Definition area. This area shows only for the open document part:
- at the top:
- Elements that can be labelled: taggable objects
- Labelled elements: objects already tagged
- at the bottom, only the object selected in the upper part (in case of table object, the system shows a preview in which it is possible to tag the value)
Finally, by clicking on the button OK the system applies the associated labels.