Multiple copy
The copy of documents is a good starting point for a user who needs to work on several documents to modify its code or its description or to update it with a new set of filters. Thanks to the multiple copy utility and to the possibility of exporting and reimporting the copied documents, the user can quicken the modification process. The utility provides two types of copy in order to allow the user to chose the one that better meets his needs. Available types of copy:
- Multiple copy of a document: select a document and then make multiple copies, or
- Multiple copy of several documents: select several documents and make a copy of each one
Multiple copy of a document
In order to make the multiple copy of a document, the user has to:
- select the source document from the documents tree and
- click the
 Multiple copy button available on the toolbar of the Documents tab.
The system will open the "Multiple copy" window as shown in the image below:
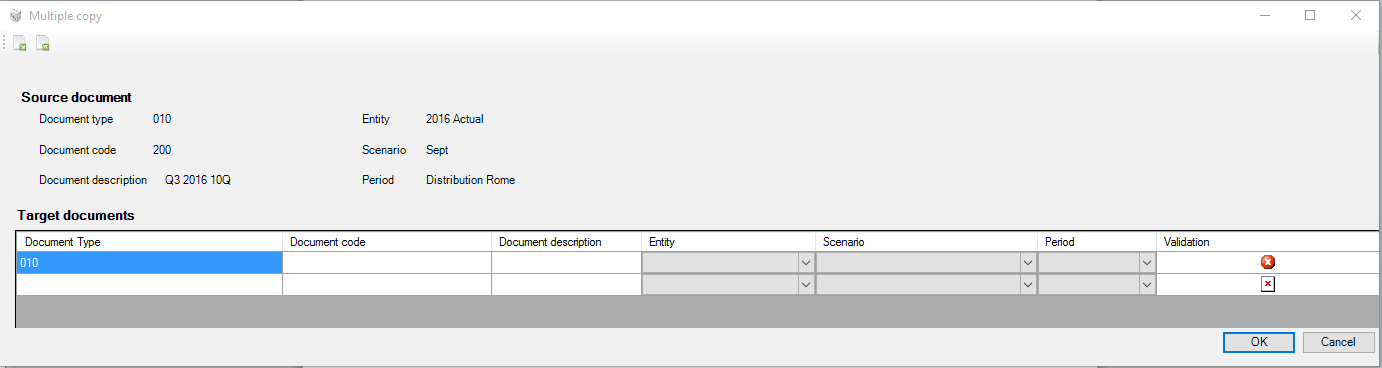
At the top of the window are some properties of the source document (type, code, description, etc) and, in order to make the multiple copy of the document, the user has to define:
- as many rows as are the copies of the document he wants to make and for each row
- assign a new code, a new description and a set of filters "Entity, Scenario and Period".
For each row defined, by clicking on the  icon displayed in the Validation field, the system checks the information inserted and, if it is correct, enables the values validation ( the icon in the Validation field turns green
  ).
).
 Moreover, it is possible to enable the Copy document: keep the states of the workflowoption, displayed at the bottom of the window, in order to keep the status of the source document's workflow also in the target documents.
Multiple copy of several documents
In order to make the copy of many documents, the user has to:
-
select the source documents and
-
click the
Multiple copy button available on the toolbar of the Documents tab.
The system will open the "Multiple copy" window, as shown in the image below:
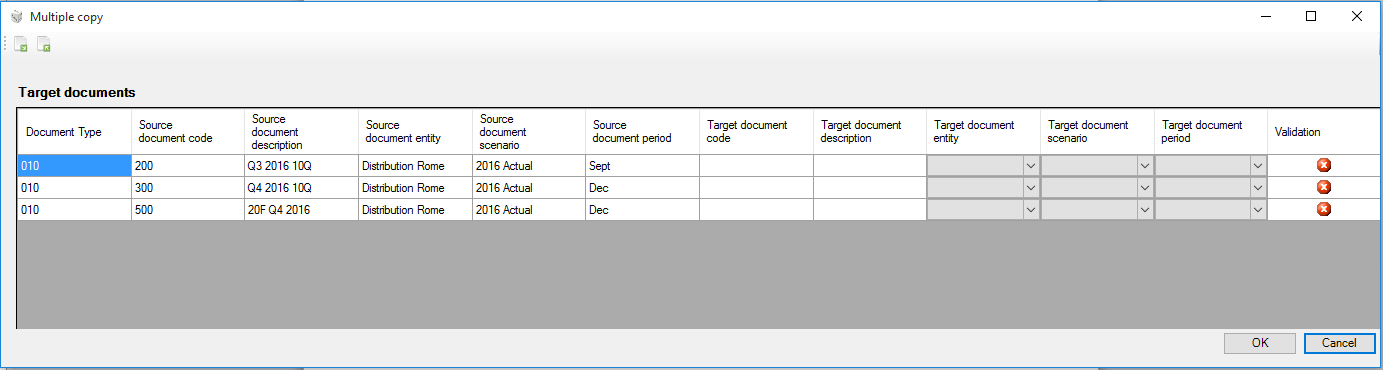
The window shows a grid containing as many rows as selected documents and for each row the user:
- in the first columns can see some properties of the source document (type, code, description, etc.)
- in the last columns defines a new code, a new description and a set of filters "entity, scenario and period" for each target document.
For each row defined, by clicking on the icon displayed in the Validation field, the system checks the information inserted and, if it is correct, enables the values validation ( the icon in the Validation field turns green ).
Moreover, it is possible to enable the Copy document: keep the states of the workflowoption, displayed at the bottom of the window, in order to keep the status of the source document's workflow also in the target documents.
At this point, by clicking on the OK button, the system runs the copy data processing. Once the copy is complete, a message will appear informing the user that the copy has been successfully completed and the new documents are displayed in the documents tree within the related document type.
Export/Import to Excel file
The Multiple copy window, provides the user with an Excel based import/export utility which allows downloading the content of the window to an Excel file which can be then modified by a user and used to import data.
This feature is very useful and fast whenever it is necessary to create many records with a few information, modify a high number of records, create or modify elements whose attributes can be copied from other existing elements by using the copy and paste utility of Excel.
Let us now see how to run an import/export to Excel. Let us assume that we export to Excel a multiple copy of many documents, modify the content of the "Target document entity" column and then reimport the file.
Export
n order to export the window of the multiple copy of several documents, the user has to open the source window and select  Export to file Excel button at the top left.
The system will open the dialogue window in which it is necessary to:
- select a path where to save the file
- enter a name for the file
- select the Save button.
At the end of the data processing, the system displays a message to inform the user that the export has been successfully completed and it exports the file.
Add / Edit data
Once the file has been exported, open it in Excel. the Excel sheet shows:
- on the rows, the elements which are currently available on the window
- on the columns, the properties of the source documents (type, code, description, etc.) and of the target documents (code, description, entity, etc.)

In our example, in order to modify the content of the "Target document entity" columns, the user just has to:
- create the filter in order to display on the window only the elements to be modified
- enter the new entity code
- remove the filter
- save the changes.
 Only the properties of the target documents can be modified. Any changes to the code of the Document Type, to the attributes of the source Document and to the Validation field will be overlooked.
Import
In order to import the new modified file, it is necessary to:
- open the same multiple copy window form which the export was run
- select the
 Import file to Excel button at the top left
 - click the OK button in order to apply the changes
During the import, data which are on the file are synchronized with data that already exist on the window, therefore it is important to follow the type of information contained. For example, the export to an Excel file of a "multiple copy of several documents" can be reimported only on the same "multiple copy of several documents" window from which the export was run.