Best Practice
This chapter contains guidelines, tips and explanations aimed at answering the most common questions and doubts.
General guidelines
Document formatting: how to manage the section breaks
The sections allows you to set up specific page layout and formatting options, such as the rows numbering, the columns or the headers and footers, for various parts of a document. For example, the sections allow you to format the insertion of a relationship on a single column and format the body of the relationship on two columns.
In Word a document is considered as a single section until the insertion of a section break. Each section break controls the layout and formatting of the section that precedes the break; if, for example, you delete a section break, the text before the break will acquire the formatting of the next section.
A "section break" is a separator between two sections of the same document and does not come with any specific settings. It can be set up in the "Page setup" window available in the Layout area of Word. Below are some good practices to follow when configuring such settings:
- configure the page settings in the first section of the child document based on how you want it to be displayed in the parent document. The "Section start" configuration in the page layout must be set to New page if you want the child document to start on the next page, or to Continuous if you want the child document to continue in the section of the parent document.
- select “Page setup>Layout>Section start”, Continuous in the previous section of the section break if you have a section break between two "Include" objects and you want this break to be continuous.
Below are some practical examples of how the section breaks work.
Example 1
If you want to change the section break type inside the parent document into a Continuous section break, you will have to change the page setup of the first section of the document part B and then set it to Continuous.
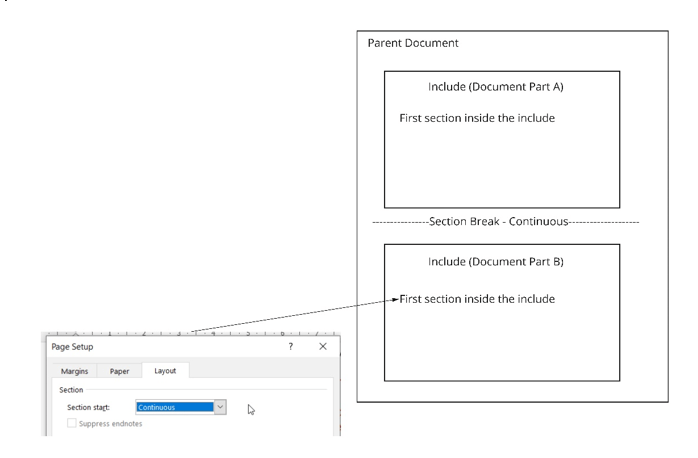
Example 2
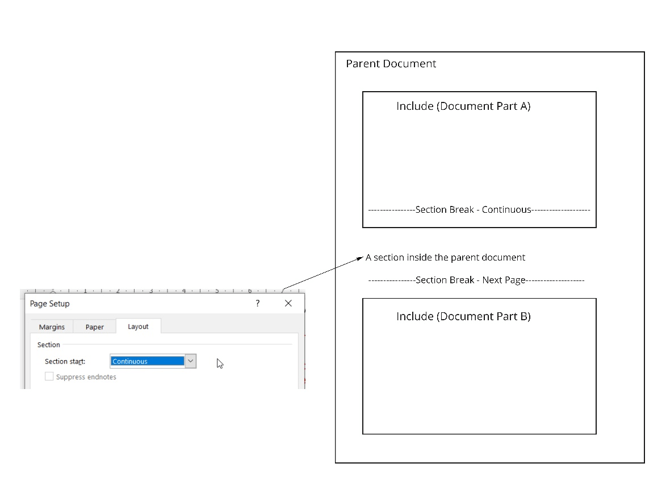
If you want to change the section break type inside the part A of the document into a Continuous section break, you will have to modify the page setup of the section inside the parent document and set it to Continuous.
Whatever the section break type configured in the part A of the document, when you refresh the parts inside the parent document, then the latter section break inside the part A will inherit the type of break based on the page settings of the section following the break (the one in the parent document in our example)
Example 3
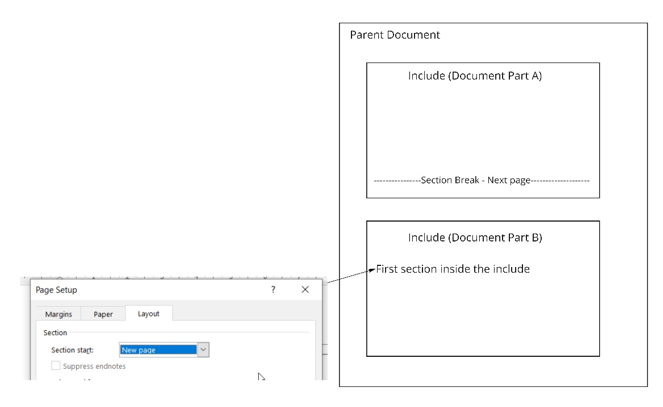
If after refreshing the parent document you want the section break type inside the child document A to be changed into a Next page section break, you will have to set the configuration of the first section inside the child document B to New page.
Whatever the section break type configured in the part A of the document, when you refresh the parts inside the parent document, then the latter section break inside the part A will inherit the type of break based on the page settings of the section following the break that is the first page of the child document B in our example.
Use the function:
-
Next page only when the user has to:
-
change the page orientation from "vertical" to "horizontal" and conversely
-
insert the page numbers and / or the page breaks
-
Page break when the user wants to start a new page and keep the section of the previous page. For example, if we assume that section A contains a paragraph ending on page 5 and we want to start the new paragraph on page 6 and keep the same section, we must insert a page break in order to move the cursor to the next page without repeatedly clicking the "Enter" key because this would cause the insertion of the spacing between the paragraphs inserted into the document during the consolidation phase
 In order to display the section breaks and other characters that cannot be printed, you have to click Show non printable characters on the toolbar (hidden character symbol)
  . You can also use the "view/outline" function to display all section breaks of the document.
 In order to prevent the "automatic page breaks" from being placed in an inappropriate point inside a paragraph, for example between rows containing a Word table that you want to keep together (in this case, it is advisable to avoid clicking repeatedly the "Enter" key to move the table to the next page), it is necessary to enable the option (from Word Page layout > Paragraph > Pagination):
- Keep lines together: to prevent the insertion of a page break in a paragraph, and
- Keep with next: to prevent the insertion of a page break between two selected paragraphs
Before saving the document part, delete any empty spaces between the cursor and the last word of the section. So no spacing will be added in the document parts included in the overall document during the consolidation phase (the spacing inside the overall document can be removed by placing the cursor over the empty row and then clicking the "Canc" key).
Specific guidelines
How to manage the page orientation
Generally, a document orientation is vertical. In some cases, for some pages or for some document's sections you may need to use a different orientation than the rest of the document. Using a different orientation in the same document means passing from the vertical orientation to the horizontal one and conversely. The page's orientation can be modified in the same document activity or from one document activity to another in the document. Specifically:
- if the modification of the orientation affects the pages of the same document activity (Item_1), for example in order to change the orientation from vertical to horizontal, then it is necessary to insert a "Next page" break in the last vertical page. A new horizontal page will be created. When you no longer need to display the pages horizontally, you have to insert a new "Next page" break in order to create a new vertical page
- if the modification of the orientation affects a whole document activity (Item_3), for example is all pages must be horizontal, then it is necessary to insert a "Next page" break at Master document level in the node the document activity belongs to (in this case, between document part 2 and 3 ). After updating the document, you will have a new horizontal page displaying Item_3. In order to return to the vertical orientation, it is necessary to insert another "Next page" break between Document part 2 and 3. This will create a new page that can be displayed vertically and will start to display Item_4 showing the information of Item_4 in a vertical orientation.
How to manage the page margins
In some cases, especially when changing the orientation of a page, the new horizontal page may have no top margin or some margins may not be as expected. This is due to the fact that when Word changes the page orientation from vertical to horizontal, it rotates the page in anticlockwise direction so the right margin of the vertical page becomes the top margin of the new horizontal page. In this case, if the right margin of the vertical page is set to zero, it means that the new horizontal page will have no margin. In this case, it is advisable to:
- set up in the template a predefined page margin setting that will be inherited by all the document parts
-
define a custom page margin setting (from Word Page layout> Margins> Custom margins) if none of the standard margins is suitable. The customization of the margins is recommended:
-
when you change the page orientation from vertical to horizontal
- if the tables don't fit the Word page
The user must customize the margins only for the pages that require it (for example, because there is a very big table whose margins need to be adjusted) and make sure that all the following pages and the previous ones keep the predefined margins.
How to manage the page numbers
The page numbers can be managed at single node, intermediate nodes and / or Master document level. On the basis of the level at which you decide to manage the page numbers, in case of node, the system will start the page numbering by adding up the pages of the various parts. When you insert the page numbers in each section of the document (single node, intermediate node or Master document) it is recommended that you override the start number and set it to 1.
In order to insert the page numbers, it is necessary to click on the header or on the footer of the first page and then select the "Page number" option (from Word Header & Footer > Page number).
In some cases, it is necessary to use the page numbers only on a specific part, different page numbers in different parts; for example if the Master document has a cover and / or an index where the page number is not needed, then it will be necessary to insert a "Next page" break in the Master document before updating it and before the first page showing the first page number.
Each level of the Document must be considered and treated as an individual document so, when you consolidate the various levels of a document, each level could be an individual document that is going to become a single document . Thus, during the consolidation phase, the "Next page" break utility is the Microsoft Word tool to use when you want to keep the page numbers on specific pages of the entire document.
How to manage the page headers
When the user works on the headers in a Document, it is important to note that each level of the document must be considered and treated as an individual document. Thus when you consolidate the various levels of a document, each level could be an individual document that is going to become a single document. the "Next page" break utility is the Microsoft Word tool to use when you want to keep the page numbers on specific pages of the entire document. The following can be defined:
- The same header for the whole document
- The same header for each level of a document
- The same header for each part (single or all pages) of each level of a document
The same header for the whole document
If the entire document must have the same header on each page, then it is necessary to define the headers in one of the following ways, depending on whether you want to display the headers:
- only at Master document level: in this case, it i necessary to insert them directly into the Master document and set the Propagate header level property to 0
- only at single node or intermediate node level: in this case, it is necessary to insert them into each node and then set the Propagate header level property to 1,2, 3, etc. according to the level of the node from which they are retrieved, level 1, 2, 3, etc. (in case of lowest level, set the value to -1)
When "Next page" breaks are inserted at Master document or single node level (e.g. to change the orientation of a page) it is important to link up the headers of the new sections by the Header & Footer> Link to previous Word utility
The same header for each level of a document
If all pages of a specific level of the document must have the same header, then it is necessary to:
- insert the same header in all pages of that specific level
- divide the document into sections in order to prevent the content of the other headers from affecting the content of the header of that specific level and conversely
- disconnect the various sections if the header must change from a given level to the next one
to do it from Word client:
- double click on the area of the headers of the pages that belong to the specific level and then insert the same content in the headers
- insert a "Next page"break (Page layout > Breaks > Next page) between the object that represents the "specific level" and the other sections, at each aggregation level of the "specific level" with another section
- double click on the header area in the page after the section break and select the "Link to previous" option (Design> Header and footer tools > Link to previous)at each aggregation level of the "specific level" with another section
It is important to insert these breaks at each level of the document containing the "level with the same header" and before running the document update
For example, let us consider a document that is structured as shown in the image below, where:
- the NOTES area has the same header with the same content, and
- the other sections of the document (FACE_FINANCIAL, FINANCIAL_STATE, etc..) don't contain any header
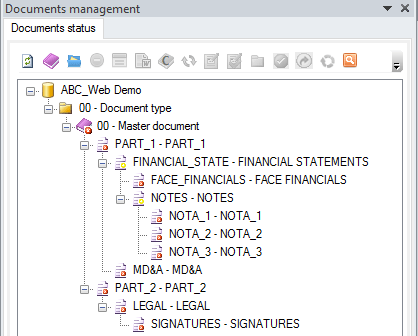
In order to make the single NOTES level have the same header inside the document, it is necessary to:
- insert the content of the header, for example "ABC WEB GROUP" in each page of the NOTES level (in our example: NOTA_1, NOTA_2 e NOTA_3)
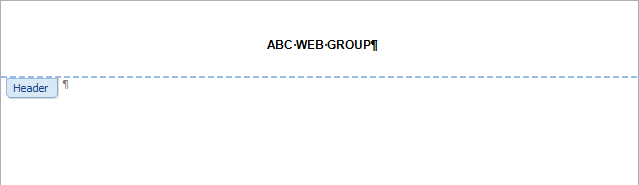
In the "FINANCIAL STATEMENTS" section that represents the first aggregation level of the NOTES section with another section (in our example "FACE_FINANCIAL"):
- divide the "FINANCIAL STATEMENTS" document into sections and disconnect the various sections, that is:
- open "FINANCIAL STATEMENTS" level
- insert a "Next page" break by placing the cursor between the "FACE_FINANCIAL" Tagetik object and "NOTES" and select the "Next page" option
- disable the Link to previous option
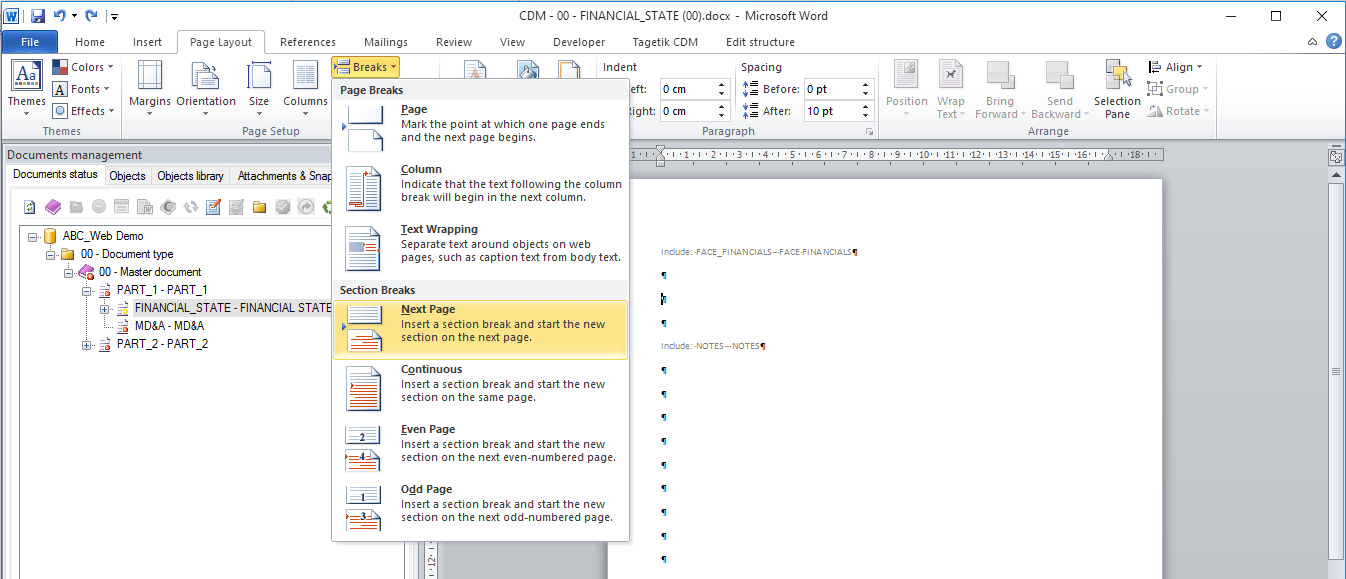 - in the "PART_1" section that represents the second aggregation level of the "NOTES" section :
- divide again the document in sections and then disconnect them from each other, that is:
- open level "PART_1"
- insert a "next page" break by placing the cursor between the "FINANCIAL STATEMENTS" Tagetik object and "MD&A" and select the "next page" option
- disable the Link to previous option
- in the "PART_1" section that represents the second aggregation level of the "NOTES" section :
- divide again the document in sections and then disconnect them from each other, that is:
- open level "PART_1"
- insert a "next page" break by placing the cursor between the "FINANCIAL STATEMENTS" Tagetik object and "MD&A" and select the "next page" option
- disable the Link to previous option
If "NOTA_3" contains a break, for example a change in the horizontal orientation of the page, the new horizontal section should be linked to the previous one at "NOTES " level or at the level of the first aggregation between the individual sections having the same content as the header. This is important in order to ensure that the content pf the header is kept also in the horizontal section.
The same header for each part (single or all pages) of each level of a document
If in the same level of a document, a single page inside a document part or all pages from one document part to another must have a different header, for example:
- "Page 1" and "Page 2" have a different header in the document part_A, or
- each page in the document part_B has a different header than document part_ A (in our example, both document part_A and document part_B belong to the same level of the document)
then it is necessary to:
- insert different headers on the "specific parts"
- divide the document into sections in order to prevent the content of other headers from affecting the content of the specific part's header and conversely
- disconnect the various sections if the headers must change from one part to the next
to do it from Word client:
-
double click on the area of the headers of the pages that belong to the specific part and then insert the relevant header
-
insert a "Next page"break (Page layout > Breaks > Next page) between the object that represents the "specific part" and the other parts
-
double lick on the header area in the page after the section break and disable the "Link to previous" option (Design> Header and footer tools > Link to previous) at each aggregation level of the "specific level" with another section
For example, let us consider a document that is structured as shown in the image below and we assume that:
- Example 1: the header's content of "Page 1" of "NOTA_1" is different from that of the other pages of "NOTA_1". In this example, from Word client you have to:
- open the "NOTA_1" document part
- insert a "next page" break by placing the cursor between "Page_1" and "Page_2" and then selecting the "next page" option
- go to "Page_2" and disable the Link to previous option
- Example 2: all pages of "NOTA_1" contain a specific header, while all the other pages of "NOTA_2" and "NOTA_3" contain a different header. In this example, from Word client you have to:
- open the "NOTA" document part
- insert a "next page" break by placing the cursor between the "Include: NOTA_1" Tagetik object and "Include: NOTA_2" and then selecting the "next page" option
- go to the next header and disable the Link to previous option
How to manage the propagation levels of the headers and footers
The propagation levels of the headers and footers can be defined in the "Advanced" area of the "Document properties" window (see image below). These fields indicates the document's level from which the header and footer must be extracted:
-
- if the value is 0, the header and footer are extracted from the Master document
- if the value is 1, 2, 3, etc... the header and footer are extracted from level 1, 2, 3, etc., respectively
- if the value is -1 , the header and footer are extracted from the lowest level of the document
In the case of the Master document, these levels determine the document's level from which (namely, the number of levels from the Master document level down) the headers and footers must be read.
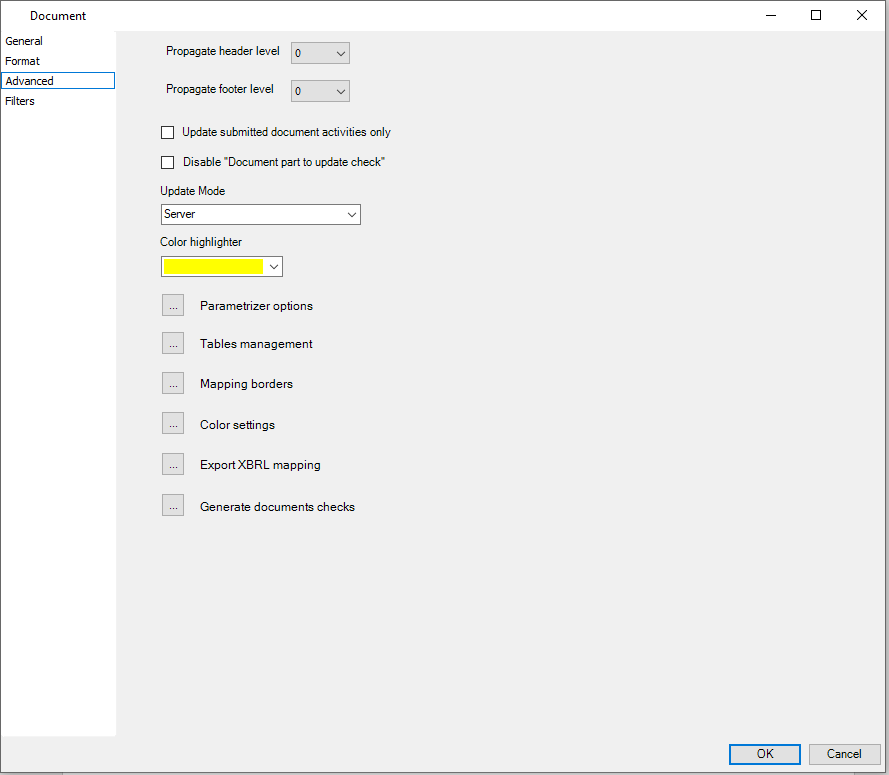
For example, let us assume that the document has the following structure :
The levels available in the structure of the previous image are the following:
Master document: Level 0
PART_1 = Level 1
FINANCIAL_STATE = Level 2
FACE_FINANCIAL = Level 3 (or Level -1 since it represents the lowest level)
NOTES = Level 2
NOTA_1 = Level 3
NOTA_2 = Level 3
NOTA_3 = Level 3
MD&A = Level 2
PART_2 = Level 1
LEGAL = Level 2
SIGNATURES = Level 3
If the headers and footers at Master document level must be read from the "third level" of the document (that is, from Face_Financials and Note_1, 2 e 3), then it is necessary to set the propagation level to "3" or "-1" since it is the lowest level.