Analytic Workspace - Advanced Analytics
An Advanced Analytics (AA) represents a set of activities that have to be run for a Machine Learning (ML) algorithm defined by a model contained in the models library.
An AA can belong to one Analytical Workspace (AW) only but several AA can be defined for each AW.
An AA can be either of "Train" type or of "Execute" type; thus, you'll have two different objects:
- Train Advanced Analytics
- Execute Advanced Analytics
A Train Advanced Analytics is the object containing the information about the ML data processing for the execution of the training of a model contained in the models library. Whereas, an Execute Advanced Analytics is the object that stores the information about the predict phase or the execute phase of a model.
Train Advanced Analytics
To reach the Train Advanced Analytics, it is necessary to open the Analytics Workspace and then click on an AW. The page of the selected AW pops up. In this page, the admin user will have to click on the "Train Advanced Analytics" tab to reach the Train Advanced Analytics.
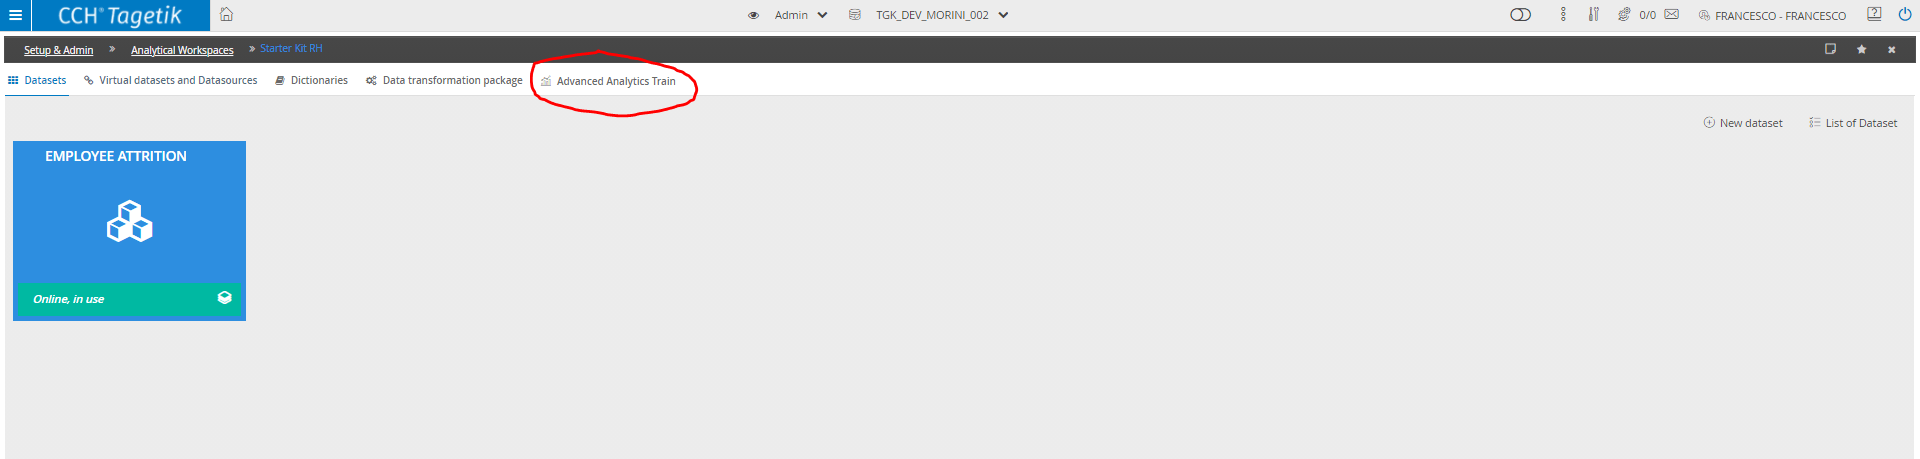
To create an AA of Train type, just click on the button  in the toolbar at the top of the window. A new row will be added in the central pane, and the right panel will show all the fields to be set up. Those fields are:
- Advanced Analytics Code: unique code that identifies an AA; this field is mandatory.
- Description: description of the AA of Train type; this field is mandatory.
- ML Model: here the user can choose the model, included in the models library, with which the Machine Learning data processing will be run; this field is mandatory.
- Input Dataset: allows the user to choose which dataset will be used as a source of data that will be then used for the ML data processing; this field is mandatory.
- Input Typology: specifies the typology that will be used as input; this field is mandatory.
After setting all the fields up, to co complete the operation the user has to click on  . The new AA is now created.
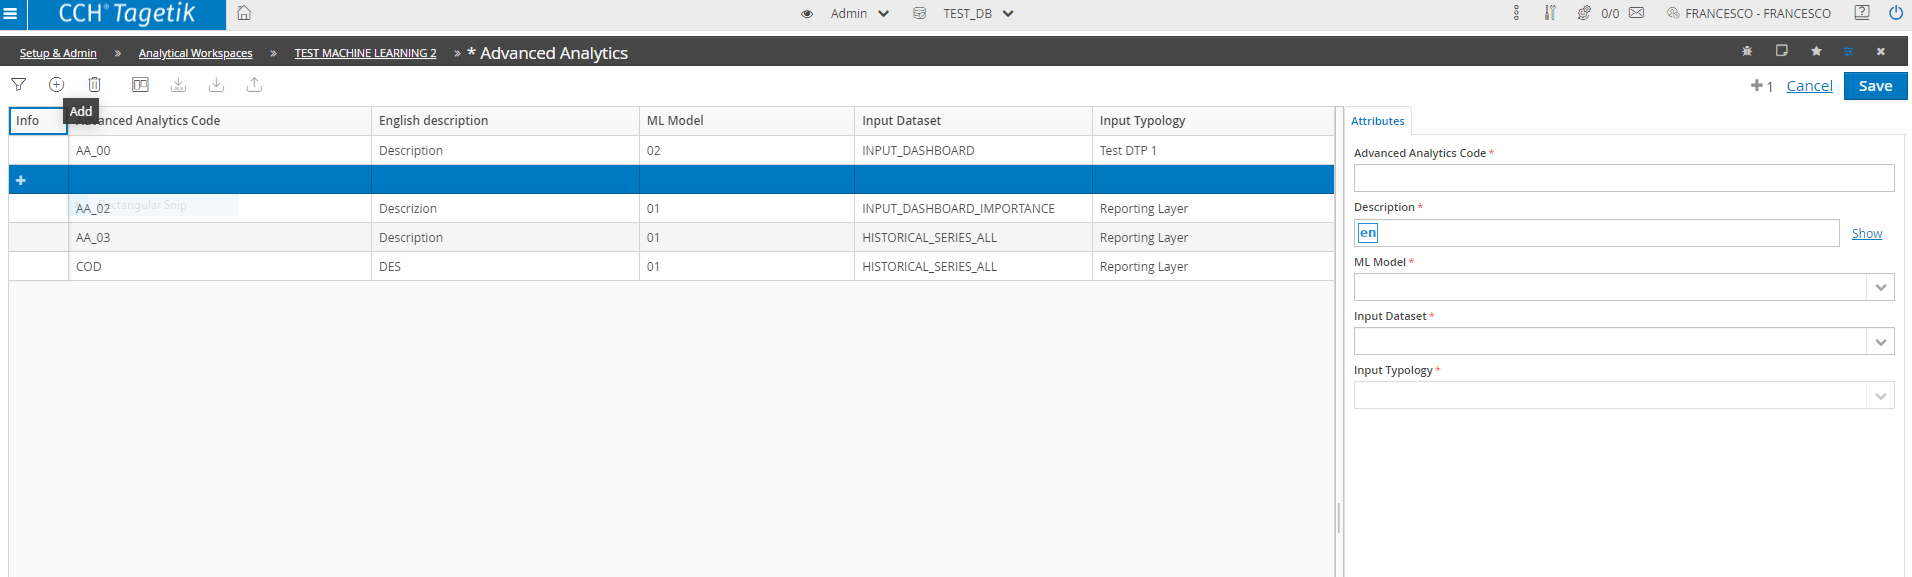
Any new AA can be either modified or deleted. To delete an AA, just select it from the list and click on "Delete"  , then click "Save" .The following warning message appears: "This advanced analytics may be in use, do you still want to delete it?". This message appears because if the AA is in use in a Workflow task, it will be removed from that task too. If you still want to delete it, just click Yes and the AA will be removed.
To modify an AA, as with the deletion, just click on the AA you want to modify and all the information about the AA will be displayed on the right hand side; every piece of information can be modified. Once the desired fields have been modified, just click on the "Save" button for the changes to be saved.
Train label
Once the admin user has created and saved an Advanced Analytics of Train type, the "Train Labels" link will appear below the "ML Model" field.
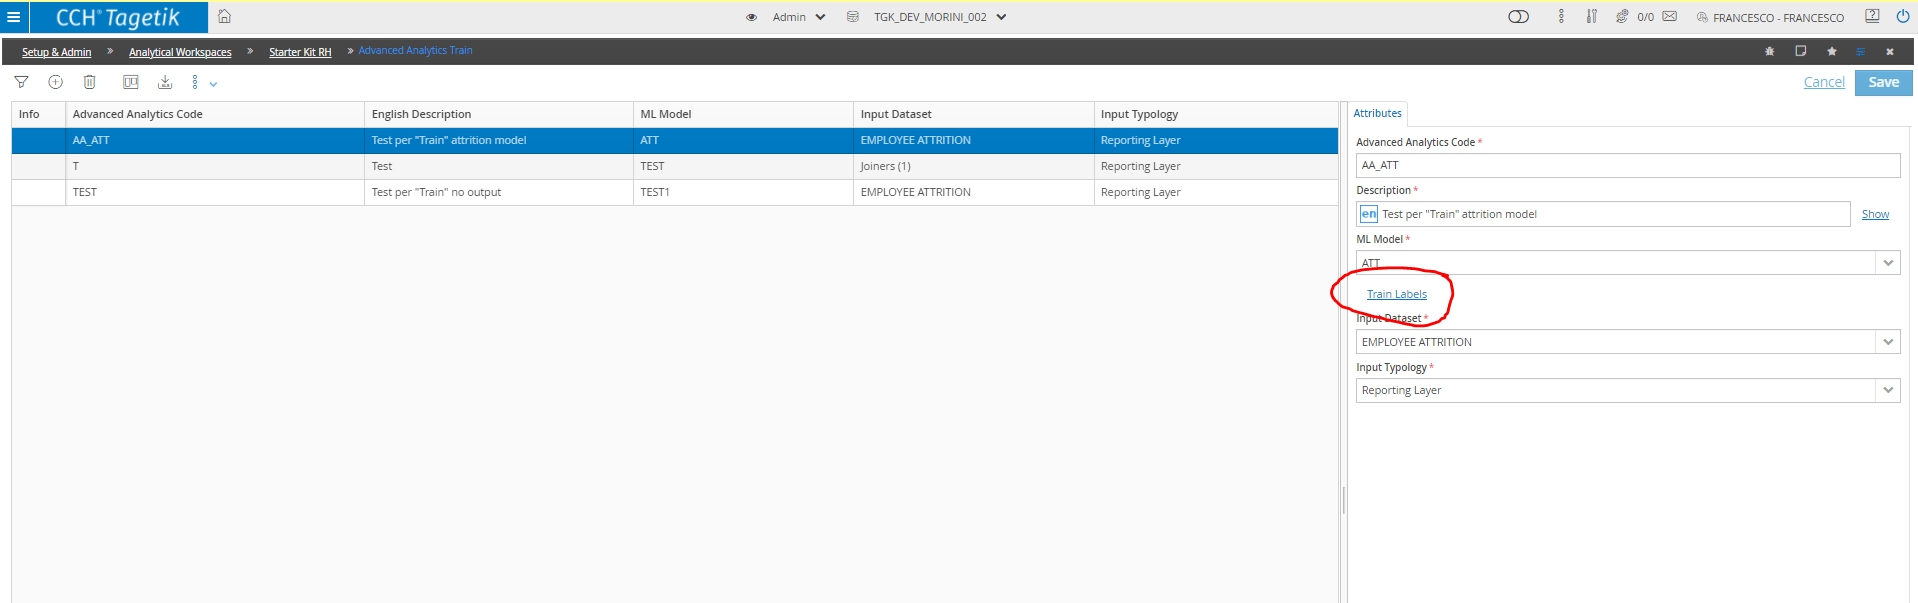
Here it is possible to save some labels for the trainings that can be used in the ML data processing. Indeed, once the ML data processing has started, it will save the train Model after the inference. The model will be serialized and saved. The Train Label represents the link to the trained model.
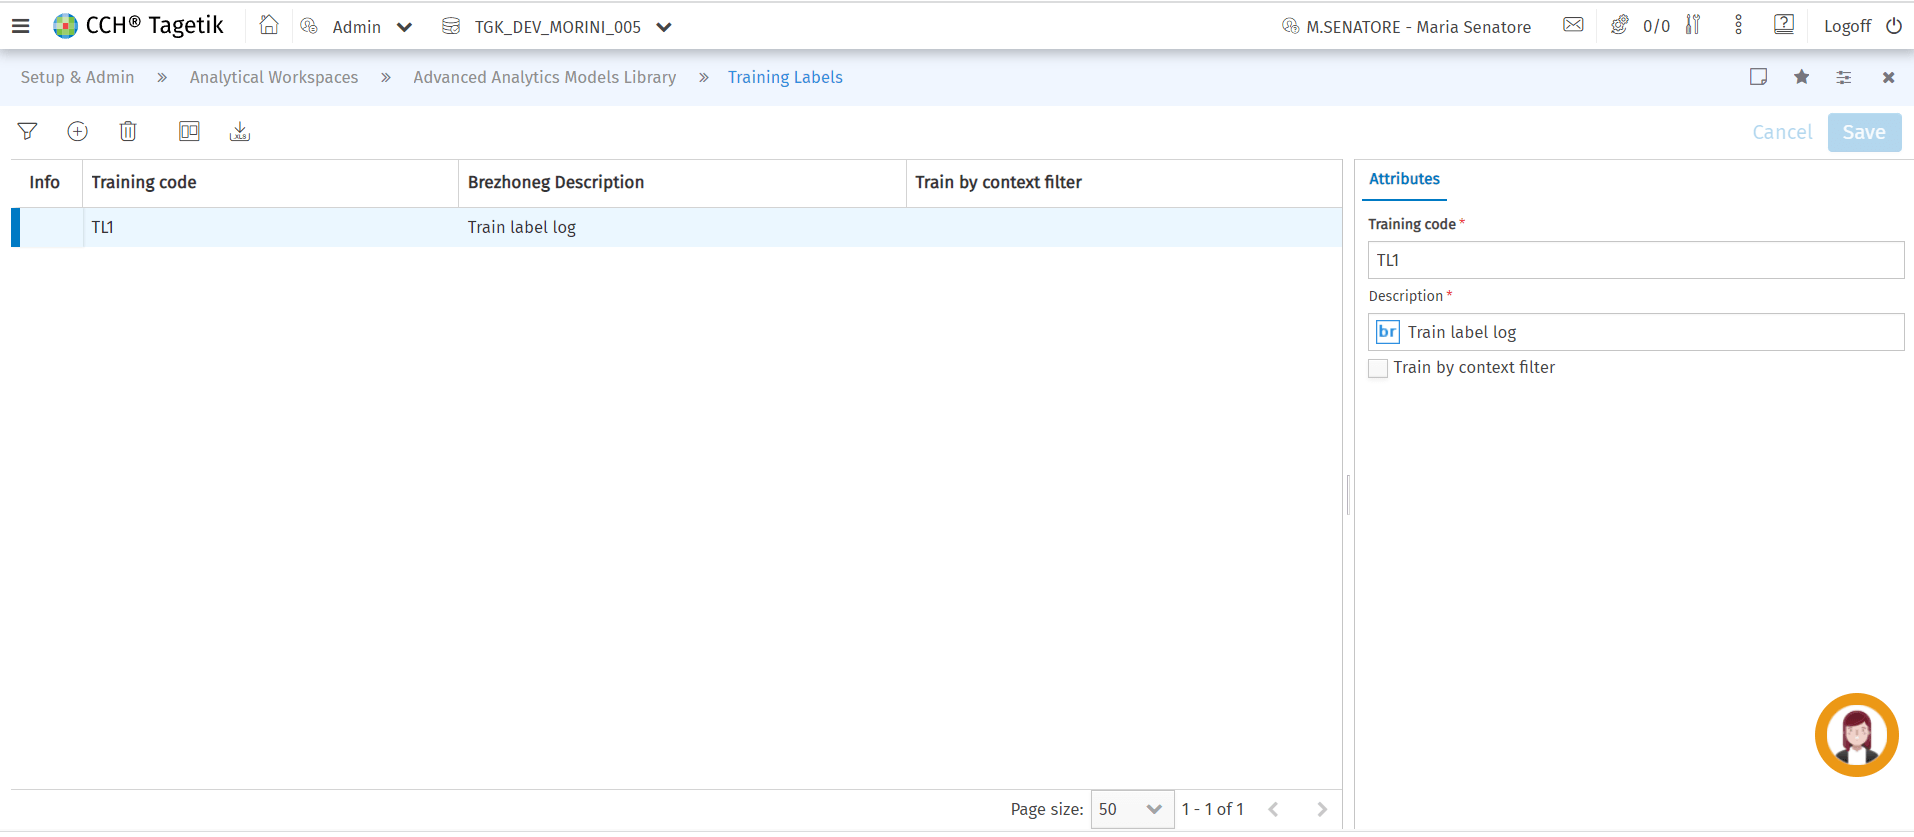
To create a Label, just click on the button in the toolbar at the top of the window. A new row will be added in the central pane, and the right panel will show all the fields to be set up. Those fields are:
- Training Code: unique code of the Train Label; this field is mandatory.
- Description: description of the AA of Train type; this field is mandatory.
After setting all the fields up, to co complete the operation the user has to click on . The new AA is now created.
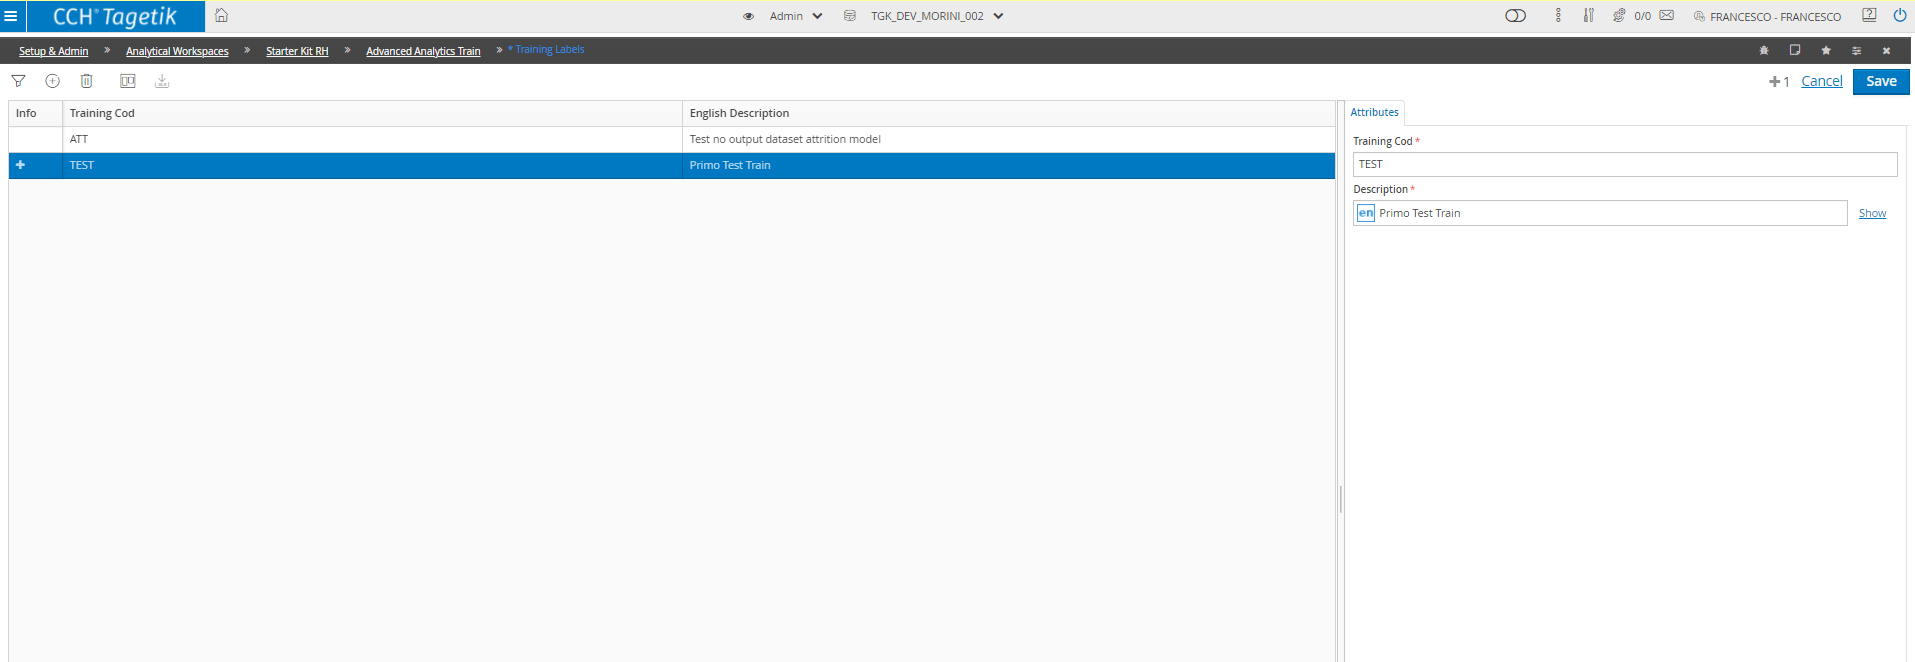
Once at least one Train Label has been created, it can be modified or deleted. To delete a previously created Train Label, simply select the one to be deleted from the list, and click on the "delete" button , and click on the button .
To edit a Train Label, as in the case of deletion, simply click on the desired Train Label, on the right-hand side all information concerning the Train Label will be loaded; it will all be editable, in fact the user (Admin) can edit all the fields of their choice, after completion simply click on the button and the changes will be saved.
The entry point of the Training Label page can also be accessed by going to the template library view, in fact, selecting one of the templates already loaded, press the "action menu" button  and select the "Train Labels" link.
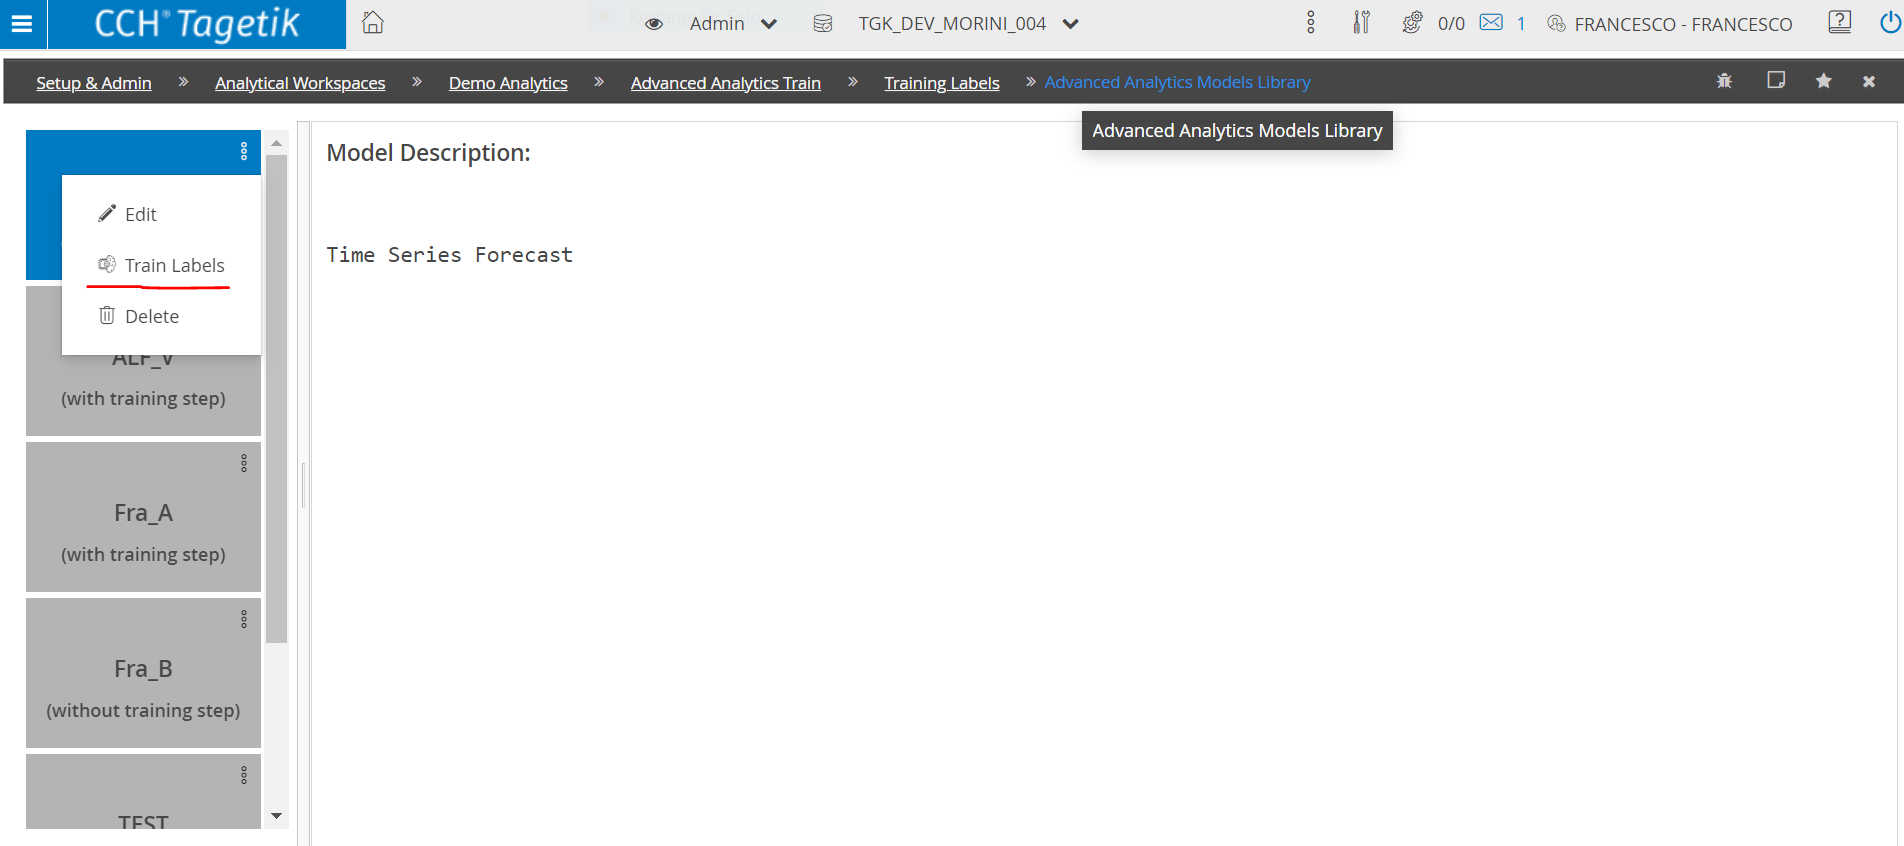
This will open the link to the Train Labels page for the chosen model.
The data processing log file can be downloaded from Audit after selecting the data processing.
The downloaded .zip file, whose name follows the structure ML_LOG_CORRELATIONOID_TIMESTAMP (e.g. ML_LOG_2C9480F47E659B7B017E670D2E8B4FEE_1642499276728), contains one or more text files with the following format ELAB_ElaborationID.log (e.g. ELAB_fa6f314b-3a66-418f-aa52-0909807ca41d.log), one for each Train or data Execute processing performed.
The log files contain information on the outcome of the data processing that the Data Scientist, author of the model, considers important to report.
Execute Advanced Analytics
To reach the Execute Advanced Analytics, it is necessary to open the Analytics Workspace and then click on an AW. The page of the selected AW pops up. In this page, the admin user will have to click on the "Execute Advanced Analytics" tab to reach the Execute Advanced Analytics.
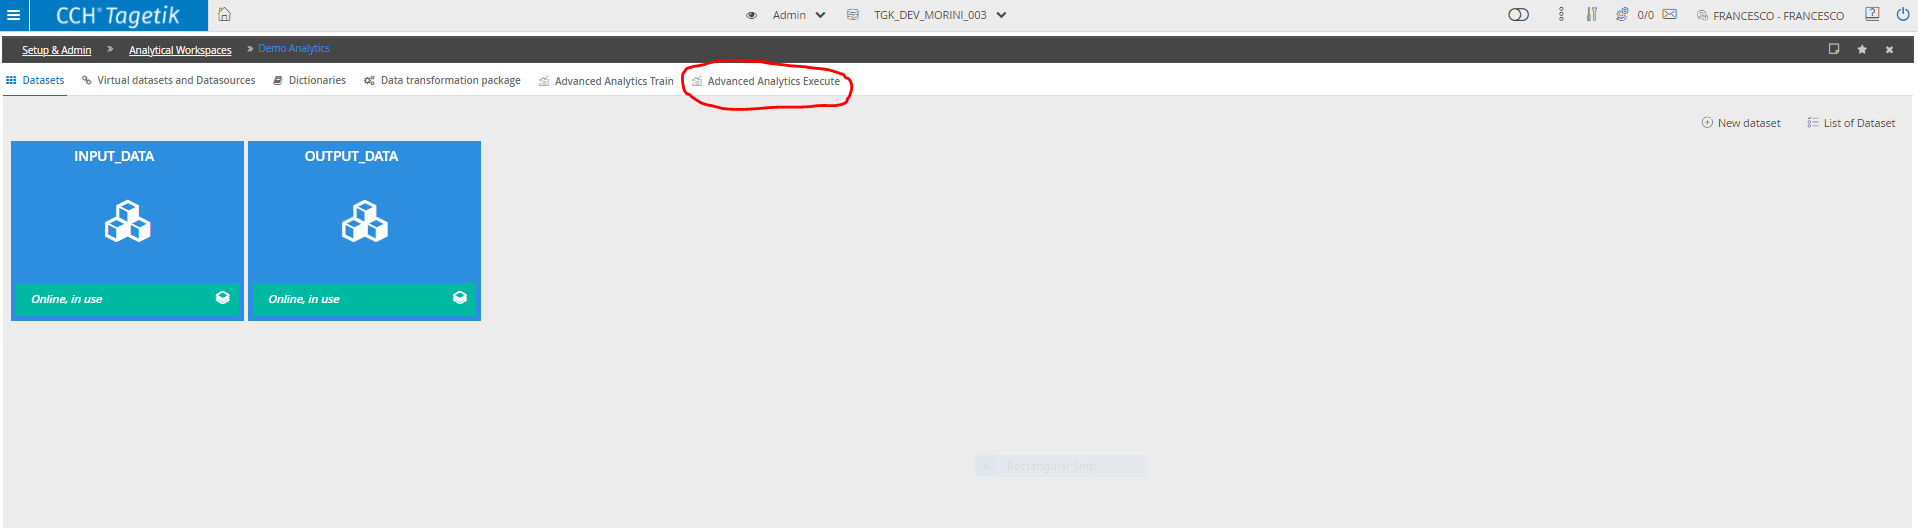
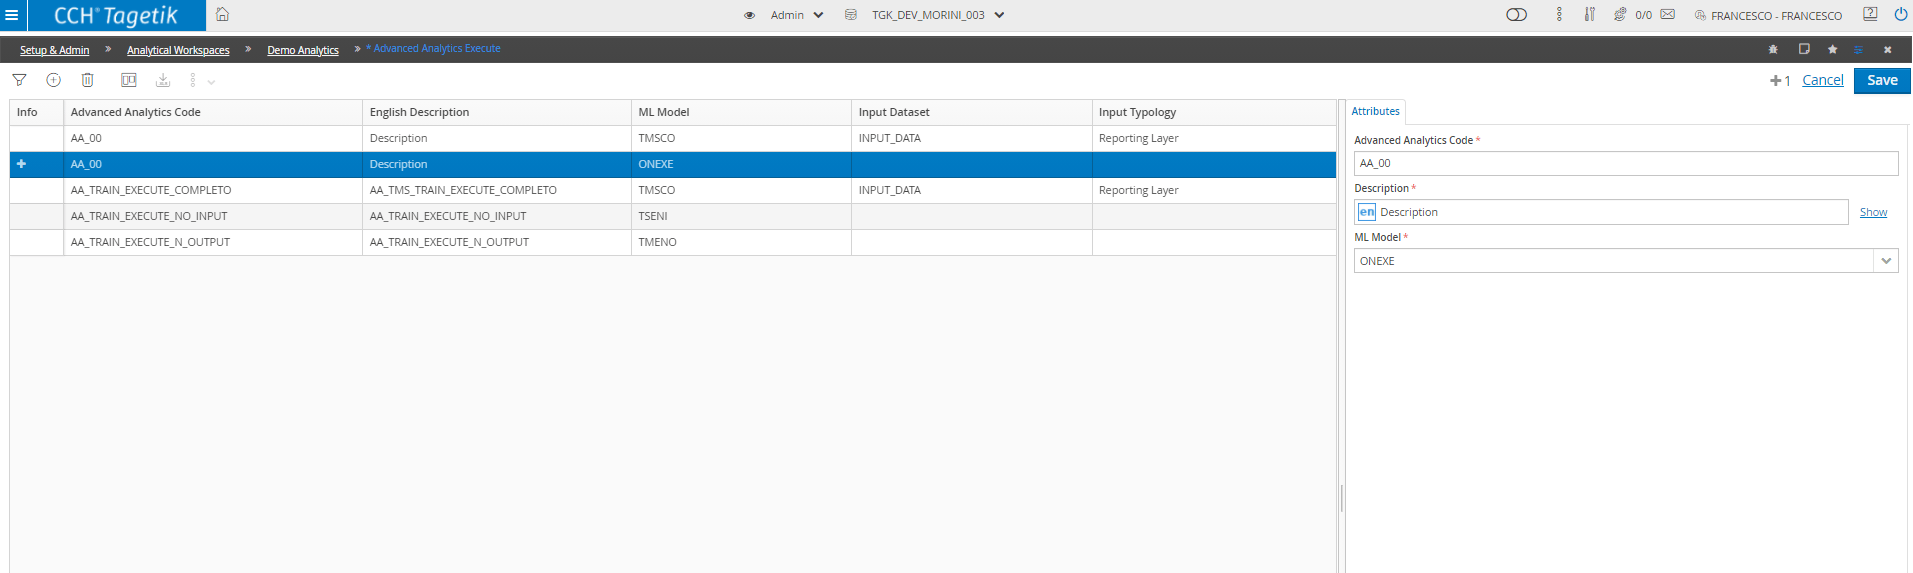
To create an AA of Execute type, just click on the button in the toolbar at the top of the window. A new row will be added in the central pane, whereas the fields to be filled in will be displayed in the right hand panel. The last two fields, Input Dataset and Input Typology, are displayed only if they are set up in the Model uploaded in the "models library" area in the "descriptor.json" gli "inferenceParameters" file. The fields to set up are:
- Advanced Analytics Code: unique code that identifies an AA; this field is mandatory.
- Description: description of the AA of Train type; this field is mandatory.
- ML Model: here the user can choose the model, included in the models library, with which the Machine Learning data processing will be run; this field is mandatory.
- Input Dataset: allows the user to choose which dataset will be used as a source of data that will be then used for the ML inference; this field is mandatory.
- Input Typology: specifies the typology that will be used as input; this field is mandatory.
After setting all the fields up, to co complete the operation the user has to click on . The new AA is now created.
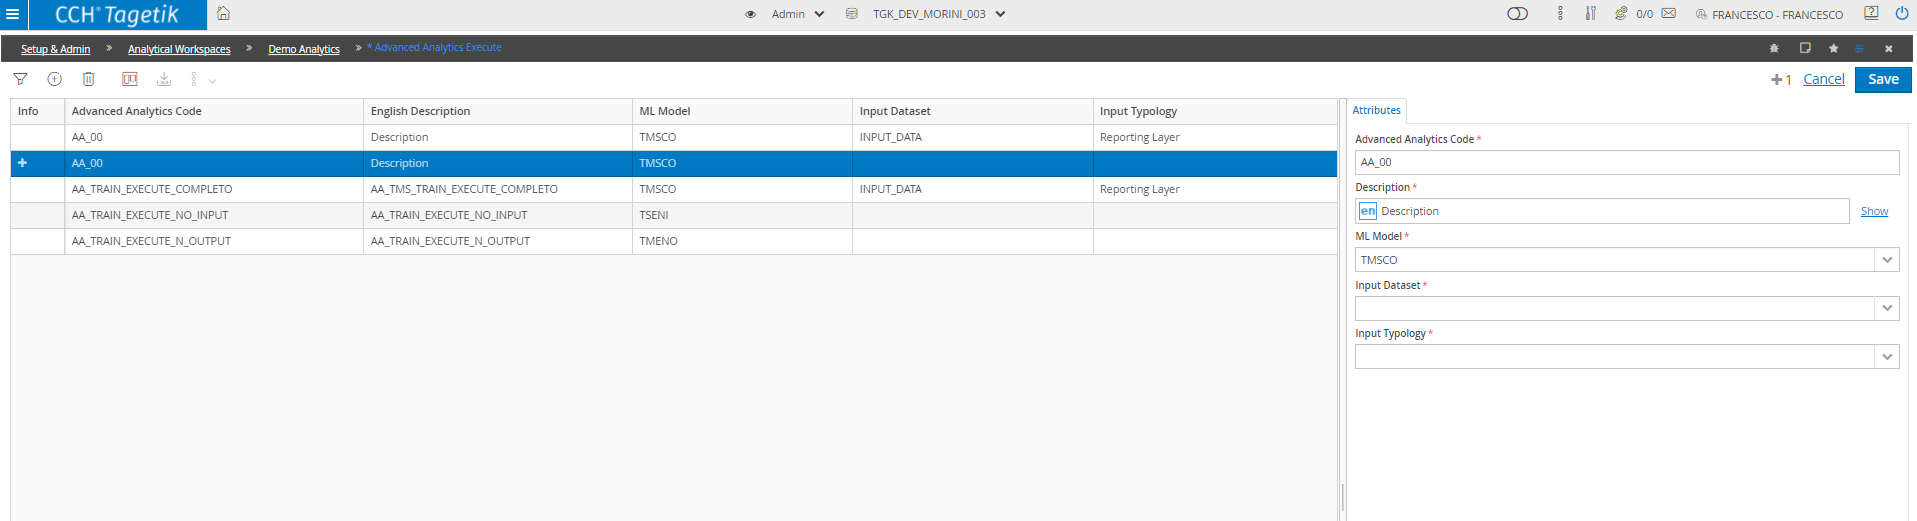
Any new AA can be either modified or deleted, just like any AA of Train type. To delete an AA, just select it from the list and click on "Delete" , then click "Save" .The following warning message appears: "This advanced analytics may be in use, do you still want to delete it?". This message appears because if the AA is in use in a Workflow task, it will be removed from that task too. If you still want to delete it, just click Yes and the AA will be removed.
To modify an AA, as with the deletion, just click on the AA you want to modify and all the information about the AA will be displayed on the right hand side; every piece of information can be modified. Once the desired fields have been modified, just click on the "Save" button for the changes to be saved.
Train and Execute by context filter
This function allows you to have model train that depend on the launch filter.
In order to define whether a label is to be saved by launch filter, go to the Train label page and select the check: 'Train by context filter'.

When launching a train configured in this way, all information relating to that launch (process, scenario, period, Entity/analytical dimension) will be stored.
 If a train is launched with the same filter combination, the information will be overwritten and associated with a new training id.
If an execute is launched with the same filter combination as the train, the data processing will end successfully. Conversely, if an execute is launched with a launch filter to which a train does not correspond, the data processing fails by displaying an error message: 'No train exists with the same launch context'.
When the 'Train by context filter' flag is set on an existing train label, i.e. you want to make the train label by context filter, a warning message is displayed warning that the data on the train label will be lost. Similarly, if an existing train has its flag removed, the same warning message will be displayed and data will be deleted.
Advanced Analytics - Fields mappings
This option allows the user to realise a mapping of the fields; it allows linking to a selected input dataset the fields that will have to correspond to those present in a file named "descriptor.json" contained in the model. These fields represent the data that will be sent to the Machine Learning engine by the data processing. Here the user can select the output dataset in which the values of the ML inference will be stored.
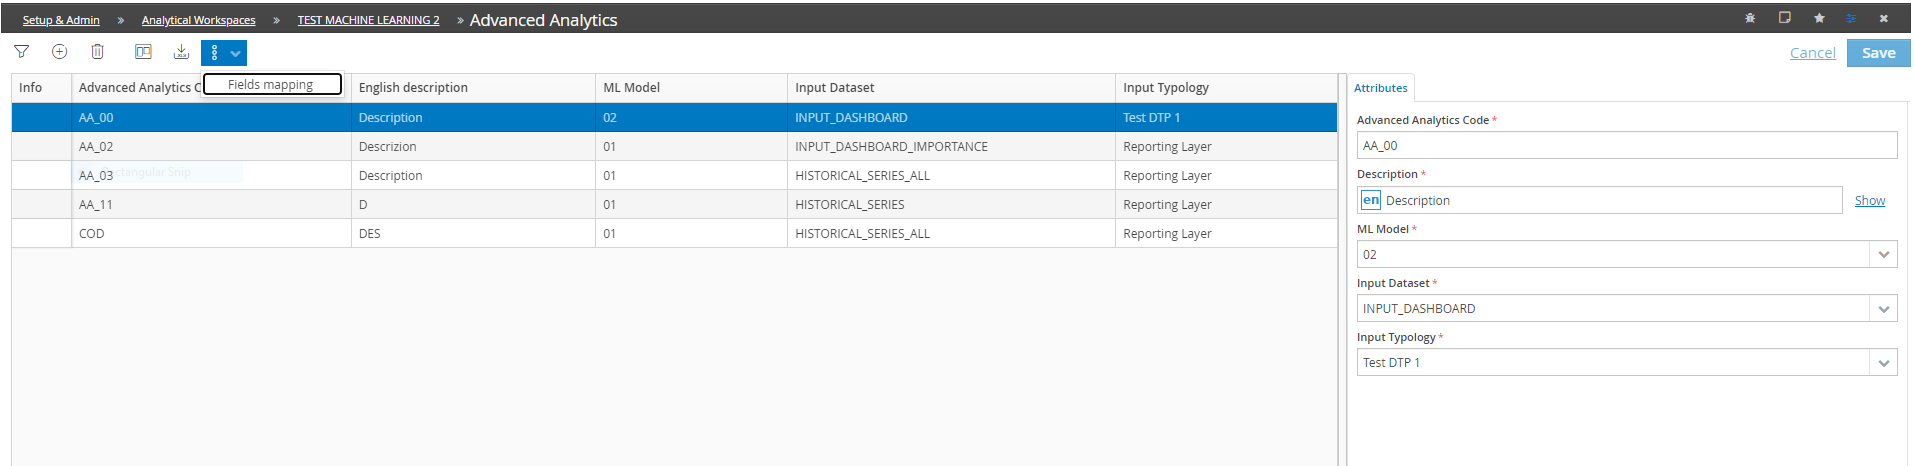
To add the section about the "Fields Mapping", the user has to click on the three blue dots  in the Advanced Analytics page and then click on "Fields Mappings". A new page will pop up.
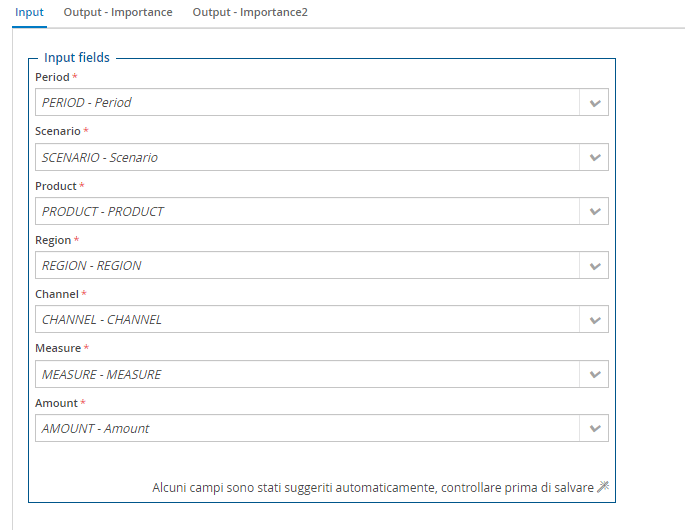
The fields mapping page displays: at the top a set of tabs, an "Input" tab and one or more "Output" tabs according to the number of outputs in the "descriptor.json": the "Outputs" are displayed in the same order as in the "descriptor.json" and each one is named according to the "OUTPUT - descrizione" standard, where the description corresponds to the "descrizione" field of the json. In the middle of the page there are two boxes, one for the fields mapping and one for the parameters. These boxes represent the fields of the dataset and are used as data to perform the inference. These fields are the same as those in the "descriptor.json" file contained in the model uploaded in the models library.
Changes made to the Fields mapping are saved using the appropriate button, which will save them in memory and result in exiting the window and, at the same time, returning to the AA page.
Loading the "Fields mappings" page enables an autofill function, both for the "Input" tab and for the "Output" ones, that fills the parameters fields with possible mappings based on the equivalence between the names and the parameter types of the output and those of the selected dataset.
In the case of automatic mapping, suggested parameter values are shown in italics, and a message in the bottom right-hand corner of the fields box is displayed to warn the user that some fields have been automatically suggested and should be checked before saving.
Once saved, if you return to the Fields Mapping page of the same AA, the message is no longer displayed.
In case the selected model has one or more array elements, both for Advanced Analytics Train and Advanced Analytics Execute, additional boxes will be loaded along with the typical field box, for both the Input and Output tab(s), referring to the array elements subdivided into different tabs, where the user can map the fields that will make up the array.
By default, the array element does not show any comboboxes to be filled with a field, but only the different Array tabs. The combobox to be filled, at the first Fields Mapping in the Advanced Analytics configuration, must be added.
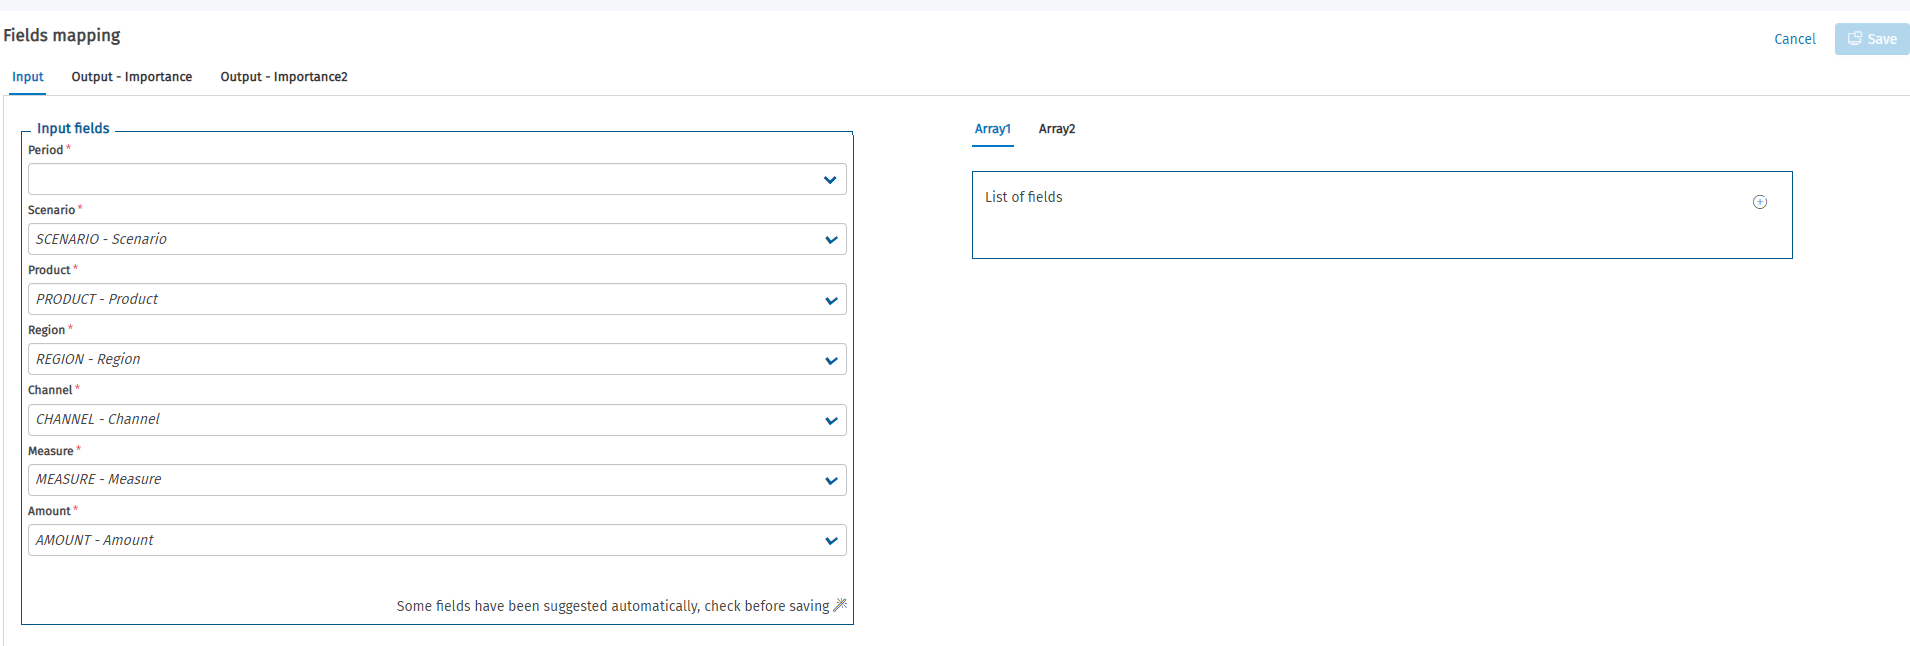
For each array element, clicking on the button adds a combobox in which to select the field that will be part of that array: this combobox can then be deleted from the array element by clicking on the delete button linked to each combobox.
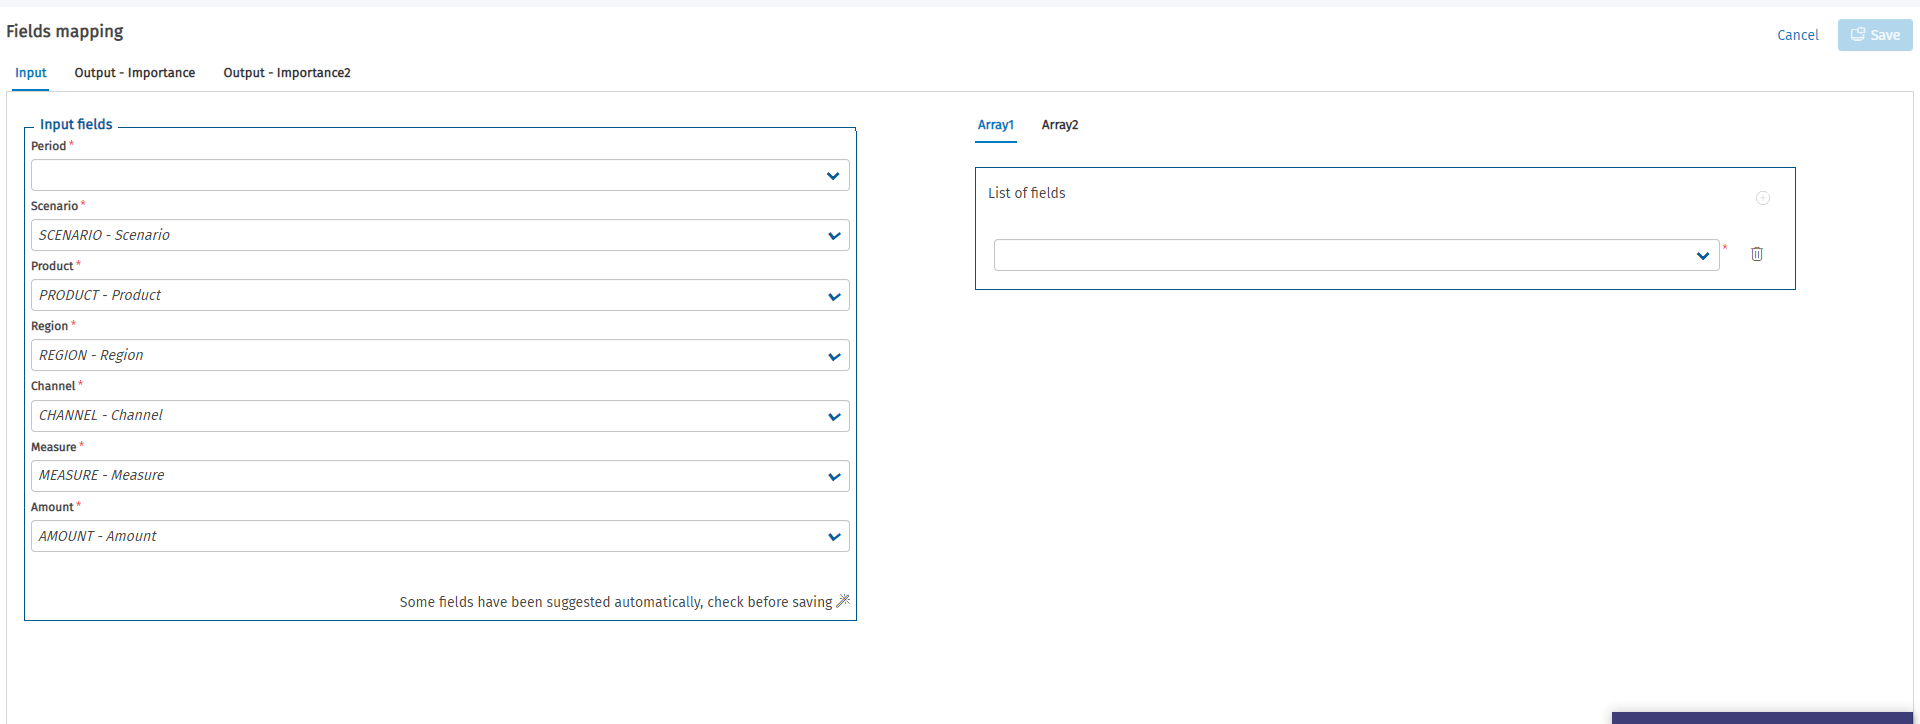
Each array element, for both the Input and Output tab(s), must contain at least one field, in order for the Fields Mapping page to be saved.
 The fields of each array of the Input tab or of the Output tab/s cannot be equal to one of the typical Input or Output fields or to the field of another array in the same tab.
If you enter equal fields for two or more arrays or an array with typical Input or Output fields, and try to save, an error message will notify you that the same information cannot be associated twice, and the saving of the Fields Mapping page does not take place.
Advanced Analytics - Model parameters
This section allows the users to display and edit the model parameters.
To reach the 'Model parameters' section, a user who is already on the Advanced Analytics page can simply click on the three blue dots and then click on 'Model parameters'. A new page will pop up.

The new page will display the list of parameters contained in the descriptor.json of the model with which advanced analytics is associated.

For each parameter, the name, description, current default value and the value contained in the model's descriptor.json and the ask at runtime are indicated.
By default the ask at runtime is set to true and only the fields 'current default' and 'ask at runtime' are editable.
If Ask at runtime is set to false, the current default value is mandatory.
The user who changes the values contained in the 'current default' field and clicks on Save can retrieve the default values contained in the descriptor.json by clicking on the 'Reset' button in the top right-hand corner.
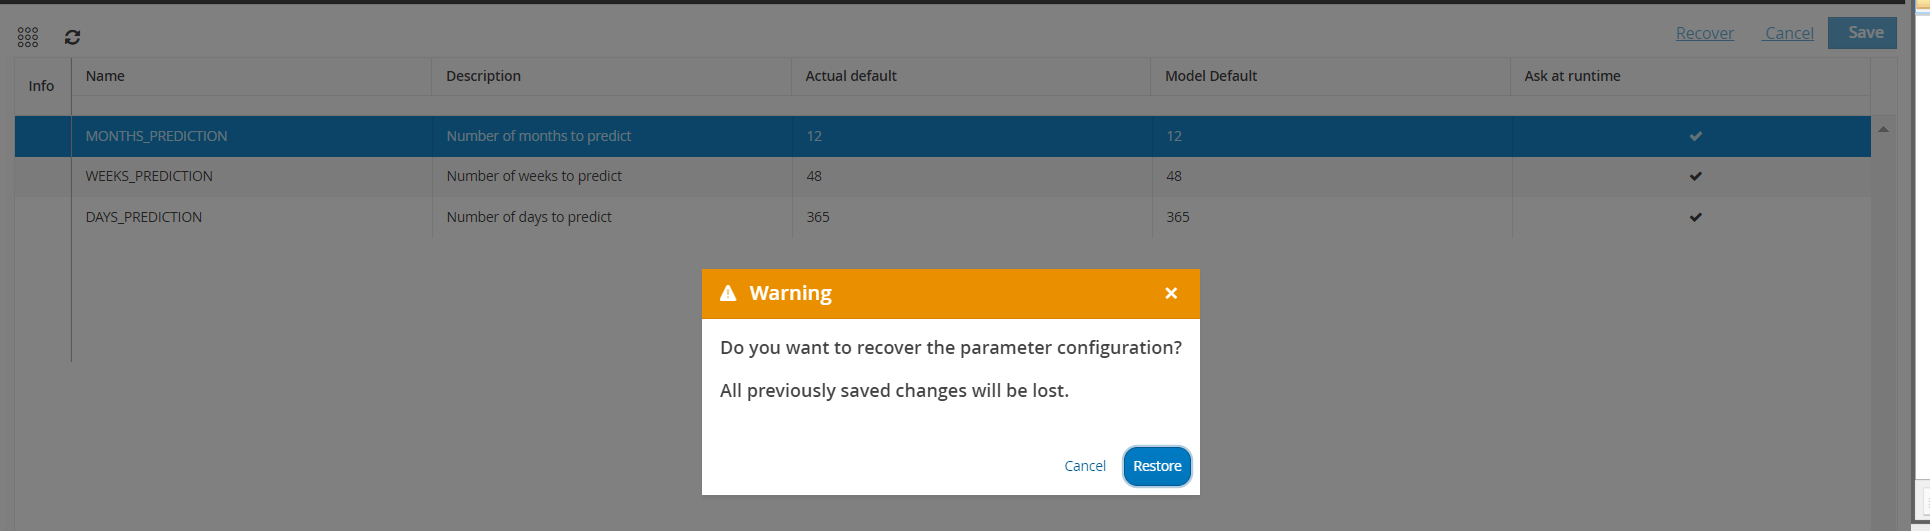
In this case, a message is displayed: 'Do you want to reset the parameter configuration? All previously saved changes will be lost'. When the user clicks on Restore, the current default value is set to the default value of the model with the 'ask at runtime' fields set to true for all parameters; if the user clicks on Cancel, no changes are made to the data and the warning message is closed.
If an advanced analytics is associated with a model where no parameters are defined in the descriptor.json, a message will be displayed: 'The linked ML model hasn't input parameters'.
If a user defines advanced analytics and does not access the model parameters, all parameters will be displayed with the default values contained in the descriptor.json when the task is launched.
If a user accesses the model parameters, only parameters with 'ask at runtime' to true and with the default value equal to the value set in the 'current default' field will be displayed when the task is launched.
WARNING: When editing the model associated with an advanced analytics, the parameters will be deleted and must be re-entered.