Attachments and Snapshots
The Attachments & Snapshots tab is displayed in the "Documents management" window when opening a document activity.
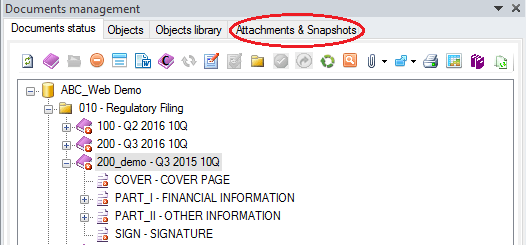
The tab is divided into two parts and its content, filtered for the open document part only, displays:
- Attachments, all available attachments
- Snapshot, any snapshot created
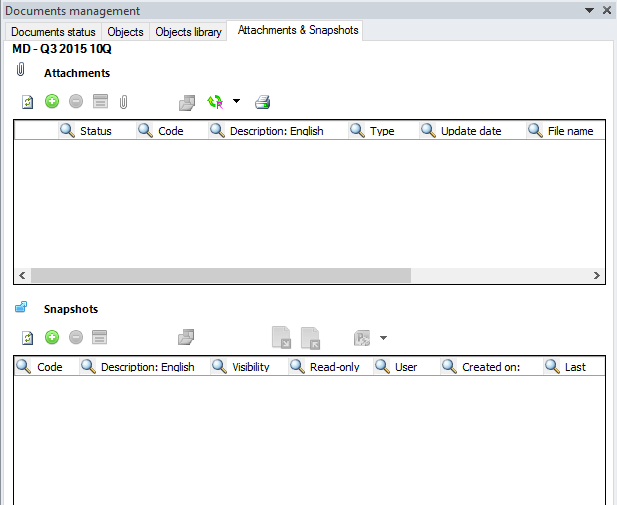
Attachments
The attachments are the files attached to a document or to a document part that allow for the addition of information to the document by using Collaborative Office objects. Such information can be kept inside the file in order to be then used as additional information, such as instructions for the contributor users.
 By default, the formulas of an Excel attachment are not automatically recalculated when you modify the value of a cell on which the formulas depend. If you want to recalculate the formulas, use F9 key or enable, in the General configuration of the application DB, the automatic recalculation for all the Excel attachments of the document (Application general settings driving the application behaviour. > Advanced Tab > Collaborative office: Attachments automatic formula calculation).
In order to access the attachments management window, after selecting a document from the documents tree, it is possible to use:
-
the button
 Attachments available on the toolbar of the "Documents" section and then choose between:
 -
Selected element: to display the list of attachments inserted for the selected document
-
All: to display the list of all attachments that can be used for the selected document independently of where they have been inserted
-
the pop-up menu that appears when right clicking on the document
- the "Attachments&Snapshots" area displayed in the "Documents management" panel when opening the document
No matter how you access the attachments management, the system will open the window shown in the image below:
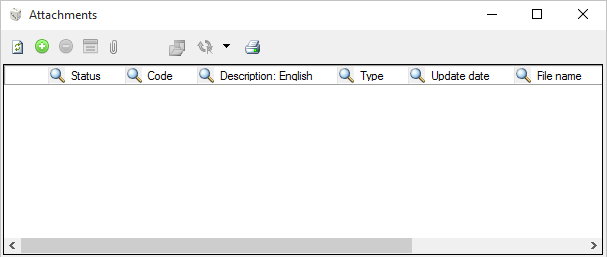
The window displays a chart containing all the attachments inserted for the selected document part and for each one it shows the following information:
- First column: by two different icons, it shows if the attachment is shared by several users
 or if it can be used only for the selected document part
  .
. - Status: by the word *new, it specifies if the file has been reattached to the parent document and warns the user if changes have been made to data and therefore it is necessary to update the selected document part
- Code: Id code of the attachment
- Description: description of the attachment
- Type: attached file's type (Excel, Word, PDF)
- Update date: date and time at which the file has been inserted / updated
- File name: name of the attached file
- Last Loading user: name of the last user who loaded / updated the file
- Last loading date: date and time at which the file has been loaded / updated
Toolbar
The attachments window includes a toolbar with the following functions:
| Button | Description |
|---|---|
| Refresh Refreshes the list of available attachments and shows any attachment just added by other users | |
| Add new attachment Opens the window from which to add a new attachment to the list | |
| Delete attachment Deletes the selected attachment | |
| Modify snapshot Opens the window showing all the attachment's properties In this window it is possible to modify only the description and display the fields of the selected attachment Available only for the attachments directly attached to the selected document | |
| Replace attachment Replaces the selected attachment with another file. This is useful when you need to replace a file with a newer one having the same structure but different data. Available only for the attachments directly attached to the selected document | |
| Open attachment Opens the selected attachment according to its extension: Excel, Word, PDF. This can be done also by double clicking on the row. In order to save any changes made to the file, it is necessary to click on the "Save" button of Microsoft Office; the system will display a window asking if the saved files must be automatically reattached or not If Add-ins installed by another software exist on the attached files, it is possible to load the Add- In when opening the attached file. In order to use this function, it is necessary to enable the Load Excel Add-inoption available in the "Local setting" area of the Client settings window When a server problem occurs while the user is working on the attachment, the system "temporarily" blocks the attachment and makes it unavailable (the "temporary" block may be also due to Word client or work session incorrect shutdown ). Such block is automatically removed by the system when restarting the server or at login. | |
| Normal update Updates all objects having the attachment as source for the selected document Recursive update Updates all objects having the attachment as source for each part of the selected document | |
| Print Prints the selected attachment |
Add new attachment
In order to add a new attachment it is necessary to click on the button  Add available on the toolbar of the attachments management window. The system will open the Attach document window, as shown in the image below:
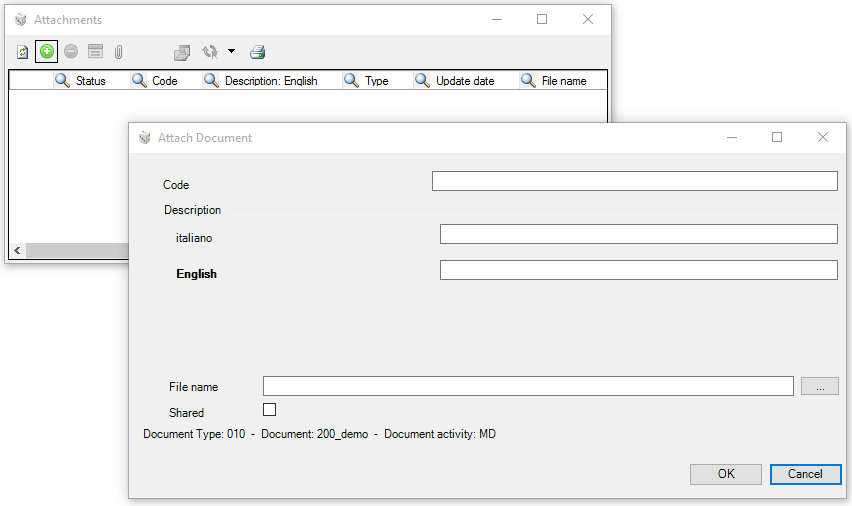
In this window it is necessary to define:
- Code and Description of the attachment
- File name: the file to attach that must be selected by using the button

- Shared: if the attachment is available in read only mode also in all children parts of the section in which it's been inserted (option enabled). In this case, its content can be used by the children sections. In those sections, the attachments are displayed in grey and when the files are refreshed, they are reattached to the parent section where the "Status" column of the attachments management window displays the word *new indicating that a modification has been done to the shared file. Otherwise (option disable), the attachment is available only for the document activity into which it's been added
By clicking on the OK button, the attachment is added to the list of those available for the selected document part.
Snapshot
In order to manage the version of a document, it is possible to use the snapshots. A snapshot is a copy of a document that can be saved and used to:
- log the work done
- be used for comparison purposes, or
- be restored instead of the current document
In order to access the snapshots management window, after selecting a document from the documents tree, it is possible to use:
-
the button
 Snapshot displayed on the toolbar of the "Documents" section and then choose between:
 -
Selected element: to display the list of snapshots created for the selected document
-
All: to display the list of all snapshots that can be used for the selected document independently of where they have been created
-
the pop-up menu that appears when right clicking of the selected document. Also in this case, it is possible to choose between Selected element and All
- the "Attachments&Snapshot" section displayed in the "Documents management" panel after opening the document
No matter how you access the snapshots management, the system will open the window shown in the image below:
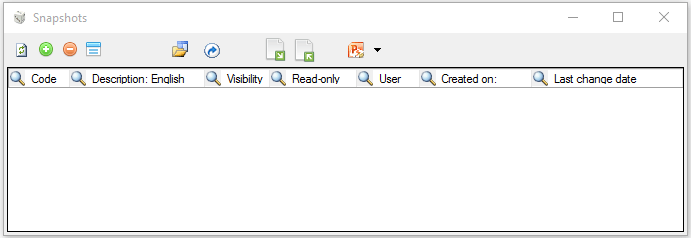
The window displays a chart containing all the snapshots inserted for the selected document part and for each one it shows the following information:
- Code: id code of the snapshot
- Description: description of the snapshot
- Visibility:visibility type of the snapshot that can be:
- Public: the snapshot is visible to all users that work on that document part
-
Private: the snapshot is visible only to the user who created it (owner)
-
Read-only: if selected, it means that the snapshot cannot be modified
- User: name of the user who created it (owner)
- Created on: date and time at which the snapshot has been created, and
- Last change date: date and time of the last change
Toolbar
The snapshots window includes a toolbar with the following functions:
| Button | Description |
|---|---|
| Refresh Refreshes the list of available snapshots and shows any snapshot just added by other users | |
| Add snapshot Opens the window from which to add a new snapshot to the list | |
| Delete snapshot Deletes the selected snapshot | |
| Modify snapshot Opens the window showing all the snapshot's properties In this window it is possible to modify only the description, display and visibility fields of the selected snapshot | |
| Open Opens the selected snapshot. This can be done also by double clicking on the row In order to save any change made to the file, it is necessary to click on the "Save" button of Microsoft Office | |
| Restore snapshot Overwrite the content of the selected document with the content of one of the available snapshots | |
| Export Exports a snapshot in docx format to a directory configured by the user | |
| Import Imports the content of a document in docx format into an existing snapshot | |
| Export to Microsoft Office file Exports the content of a snapshot in one of the following formats: pptx, xlsx, docx and csv. For further details, see Export to Microsoft Office products |
 In the case of a snapshot of multi-level documents, the children documents will not be involved in the restoration and, if the restoration involves an "approved" document, then the system is not able to restore the snapshot.
Add snapshot
In order to create a snapshot, it is necessary to click on the button Add available on the toolbar of the snapshots management window. The system opens the Add snapshot window, as shown in the image below:
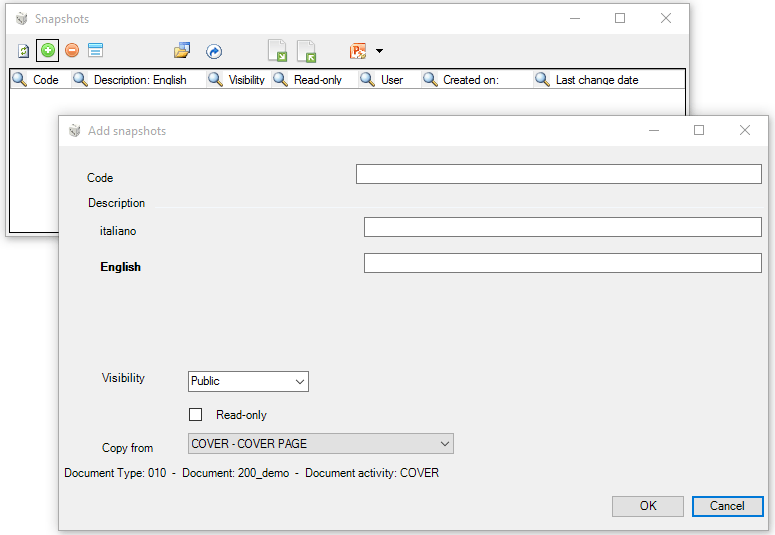
In this window it is necessary to define:
- Code and Descriptionof the snapshot
- Visibility: the visibility can be Public or Private depending on whether the snapshot must be visible only to the user or to all users who work on that document part
- Read-only: if the snapshot is in read-only mode and cannot be modified (option enabled)
- Copy from: if the content of the snapshot must be copied from another one among those available for the selected document
when clicking on the button OK the snapshot is added to the list of those available for the selected document activity.
Import / Export snapshot
The snapshot Import/Export utility allows for the migration of single document activities from an environment to another. Let us assume that we want to move one single document activity from a "User Acceptance Testing" (UAT) environment to a "Production" environment. To do that, it is necessary to:
- create a snapshot of the desired document activity in UAT
- export the snapshot created from UAT
- select a document activity in Production to which we want to export the file saved from UAT;
- create a snapshot of the document activity in Production
- import into Production the file saved from UAT by selecting the snapshot created in Production and finally
- restore the snapshot imported in Production in order to complete the migration
As in the example above, it is necessary that the environments involved in the snapshots import/export have the same structure. Indeed, for example, if the snapshot in UAT includes an Object A that refers to a Table X
and the snapshot in Production includes an Object B that refers to a Table Y, when restoring the document in the Production environment, it does no longer contain the Object B but the Object Aand, if Table X the Object A refers to doesn't exist in Production, then when updating the document, the system will give an error.
Unlock snapshot objects
When opening a snapshot, in the "Objects" area the system displays as Locked all objects contained in the document. In order to unlock the objects, it is necessary to select the check box on the left of each object and then use the button  Unlock available on the toolbar as shown in the image below:
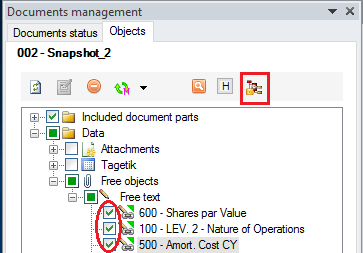
Once the objects have been unlocked, it is possible to modify them. After saving the document, the system locks again all the document's objects and in order to make further modifications it will be necessary to repeat the procedure described above.