The projected P&L
Once the Initial Balance Sheet has been loaded and the payment and collection transactions on those items have been performed, it is necessary to load the second input data item necessary for the Financial Planning, namely the Projected P&LLoading P&L Data.
The Financial Planning process in Tagetik needs a projected P&L compiled up to at least the EBITDA, because everything below that margin (depreciation, short- and long-term financial expenses/income, taxes etc.) can be calculated directly by the system.
Once the Projected P&L is available, each financial manager reviews, for his own company, the financial rules to be applied to the P&L dataVerify Financial Rules and Attribute Overrides (CFP Rules Window) or:
- verifies and applies all those billing and financial rules associated with each P&L, which will determine specific forecast balance sheet and financial variations;
- verifies and potentially changes the data related to the events (accrual, accounting and financial) created by the data item entered.
Loading P&L Data
The P&L can be managed in several ways:
- by using the functionalities of the ETL module to load the data from any ERP system and in general from any IT system in which they are managed;
- data entry forms;
- by using the data copy utility;
- by using the special web window accessed from the end user’s web interface through the processes cockpit by using a workflow model button or task.
P&L Web Window
To access the initial Actual Balance Sheet web window it is necessary to click on the “Processes” button (available on the end user’s home page) and select the desired process
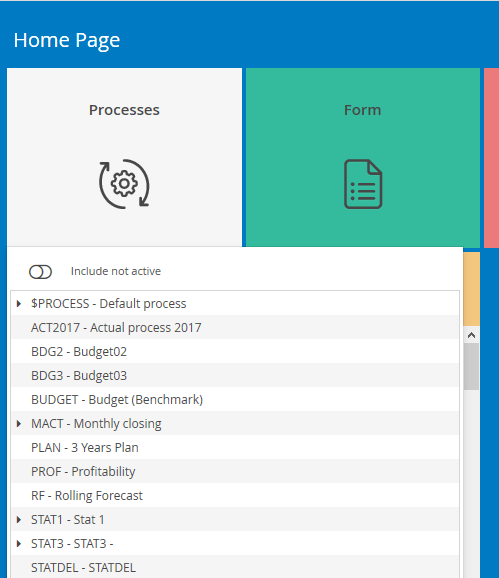
Once the selected cockpit is open, it is necessary to:
- select one of the phases of the process at the top of the screen
- select one of the entities over which the user has editability rights
It is possible to view/enter and change P&L data by accessing the web window (which is a view in the P&L) using the following methods:
- from the
 Cash Flow Planning button, by selecting the P&L option
By clicking on the Cash Flow Planning > Profit and Loss button from the end user’s web interface through the processes cockpit, the system pre-sets the information related to process, entity and scenario and shows the (gross and intercompany) balances of the P&L accounts.
Each P&L value is managed by process/scenario/entity and is identified:
- by a standard account of a “P&L” nature
- by any custom dimensions being managed;
- in cases of intercompany data, by the counterparty entity and any custom counterparty dimension 2 if the relationship type for the process is “By entity / custom dimension 2” or “By entity / Synthetic custom dimension 2”
- by the currency;
- a monthly amount expressed in the original currency (amounts in the entity currency can be displayed in the grid)
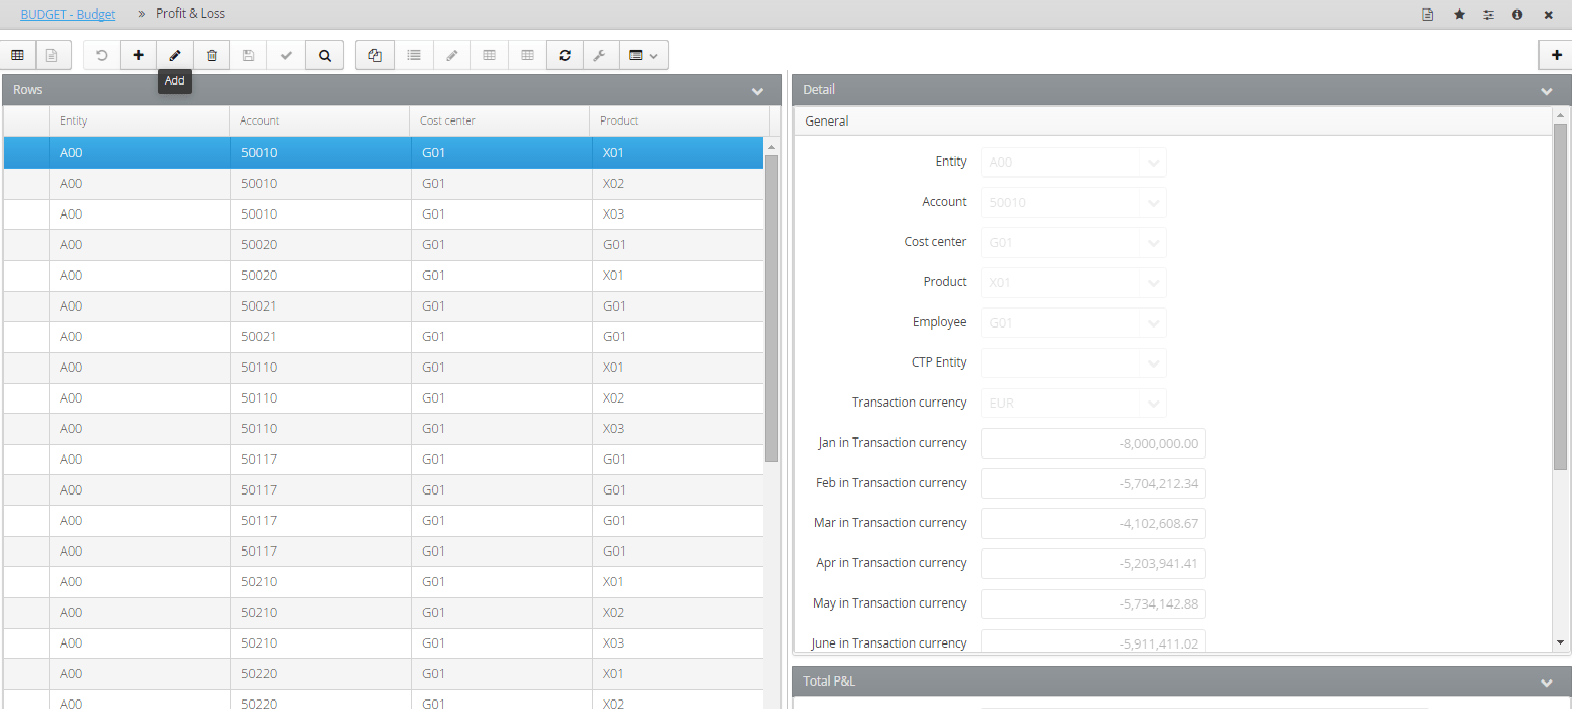
 In the window opening phase, the system displays the gross balances and intercompany balances originating from one of the origins configured as inputs. For more details, see Input origins configuration.
Verify Financial Rules and Attribute Overrides (CFP Rules Window)
Once the P&L forecast has been loaded, the next step may be to verify/change the billing rules, the impact on financial variations, balance sheet contra-entries, VAT rate, etc. associated with each account based on what has been defined in the matching of the dimensions to the financial rules.
In this phase, the company user can accept what has been defined on behalf of the administrator or make changes.
Access to the financial rules window takes place through the P&L window, or from the web form.
Access from P&L Window
The user can access the financial rules (CFP rules) override window in two ways:
- from the P&L Web Window, by clicking on the details button after having selected the row (or rows) to be overridden;
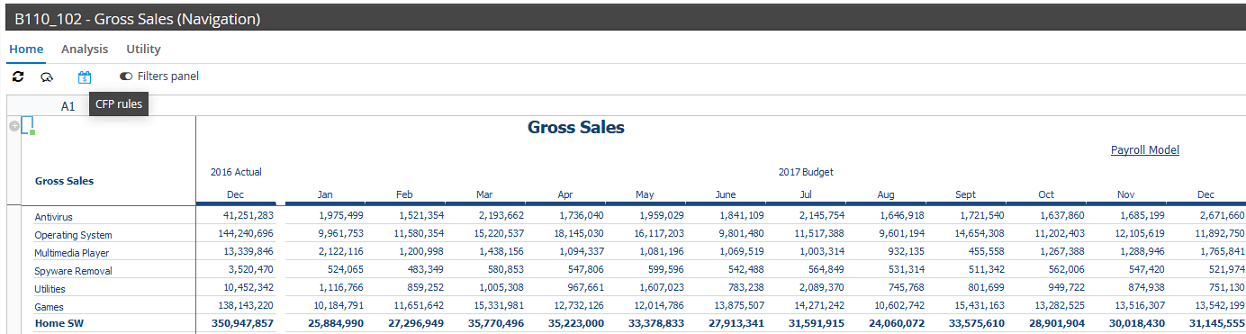
- from a web form, open in data entry or in browse mode, containing P&L data, through the CFP Rules button on the ribbon bar, after having selected one or more cells (elements, totals or nodes). For example, consider a web form containing data for revenues by product family (as shown in the figure); after having opened the form in data entry or browse mode, by selecting one or more cells and clicking on the CFP Rules button, the entity manager has access to the web window showing details of the financial rules for the selected rows.
The detailed financial rules (CFP Rules) window is divided into two main areas:
- a display area: Financial Impact
- a rule and data management area through the two sections: Attributes and Events
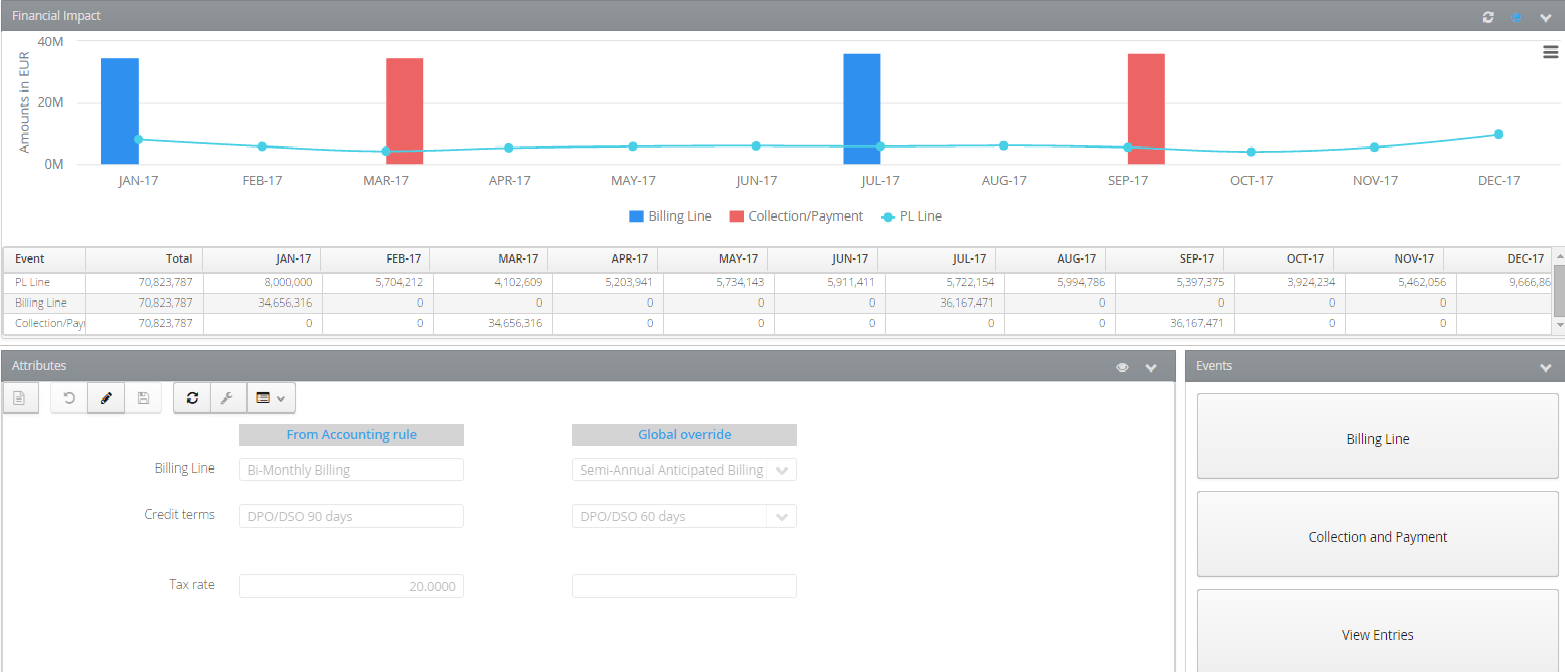
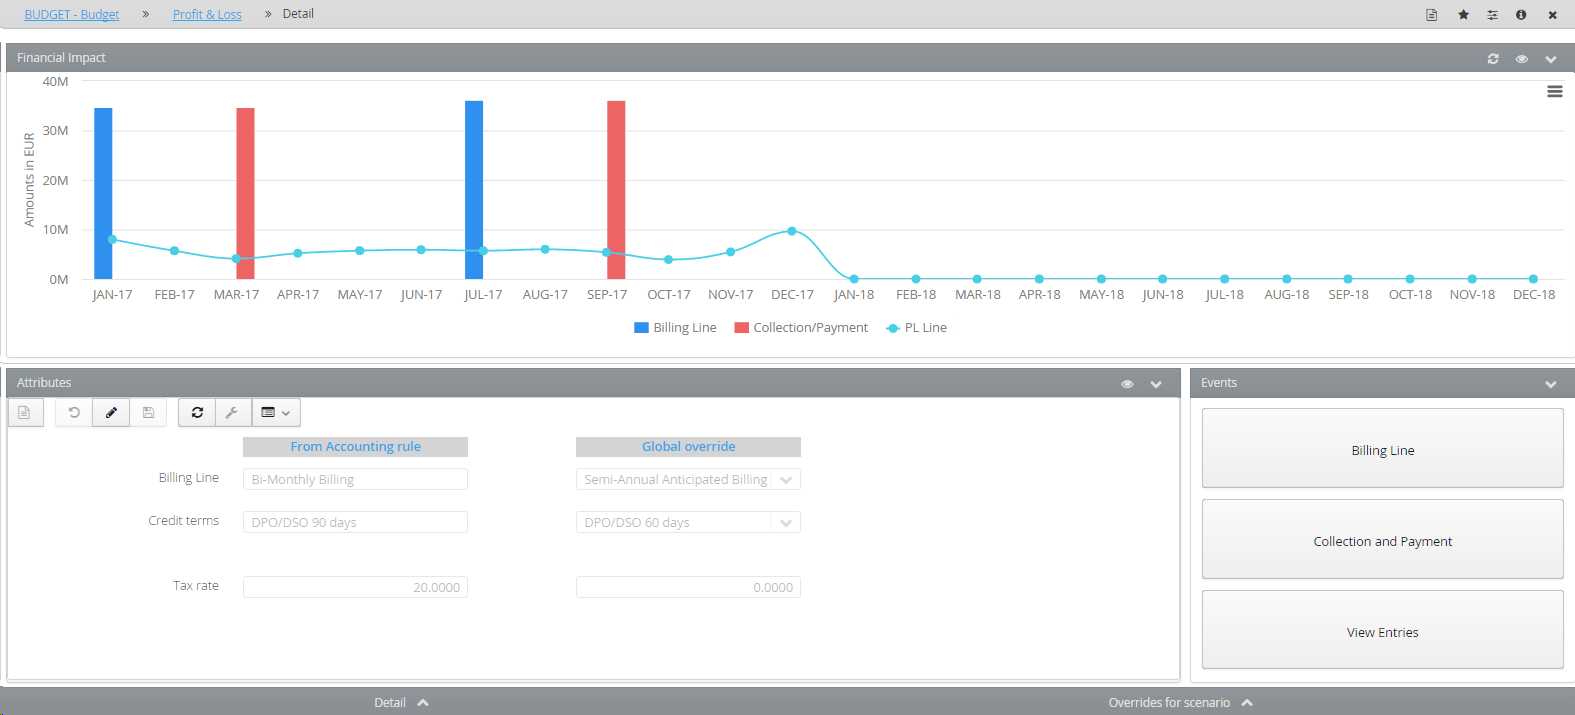
The Financial Impact section displays the total amounts over the month, graphically and in table format (by clicking on the  icon), for the events created for that specific account (without taking account of the VAT impact) and this is for all scenarios included between the simulation start and end dates. For example, if we consider the revenue account with the accounting model that provides for accrual, billing and credit terms (as in the figure above), we have the following events:
- accrual (e.g. accrual relative to revenues) where the monthly amounts for the year are displayed.
- billing (e.g. impact on receivables from clients) containing the amounts based on the create event rule defined for the account (From accounting rule) either overridden or inserted manually
- collection and payment: (e.g. impact on the c/a bank account) which represents the financial curve generated on the basis of the credit terms rule defined for the account
 For Forecasts, in addition to the “Annual Total” present in the table-format view, there is also a further “Estimated total” field
In the event that a single P&L tuple has been selected, it is possible to change the accrual, billing and cash movement directly in the grid. Changes are always saved at the end of the month. If the billing event is edited when saving, the rule override transfers to “Manual rule”. If the collection and payment event is edited when saving, the credit terms override transfers to “Manual credit terms”. For budgets, it is possible to edit the “Total” column and the value to be set is divided equally for all budget periods. For forecasts, it is possible to edit the “Estimated total” column (in this case the value to be set is also divided equally for all forecast periods).
Note that the amounts relate to the selection made in the previous window, and so if a multi-selection has been made, the data display will relate to the selected records (visible in the details section at the bottom of the window and by clicking the  button)
In the Attributes section:
The left-hand side of the window displays the “Attributes from the Accounting model rule” set at the group level or customised for the individual entity during the setup check phase.
On the right-hand side it is possible to override all of the accounting model rules. These overrides are applied to all scenarios contemplated in the simulation unless specified otherwise in the Overrides for scenario tab Example 2 Override credit terms for a scenario. The attributes that can be managed when opening the window are those established and for which values have been entered in the accounting rule and are, in the most common example, as follows (as per the above image)
- Create Billing Line rule
- Credit terms
- Tax Rate
If the user wants to transfer from credit terms with a rule to manual credit terms, this can be done in two ways:
- “Manual” override of the “Override all” field and then add the rows from the “collections / payments” button in the Events section
- change the rows already present using the “collections / payments” button in the Events section (the system automatically performs a “Manual” override of the credit terms)
It is also possible to manage overrides for individual rows, from the menu Actions ( ) > Credit terms and taxes detail and from the menu Actions () > Event rule detail.
In “Credit terms and taxes detail”, the user can give different credit terms and tax rates for each individual P&L row (belonging to the node/selection made)/scenario.
In “Event rule detail”, the user can override the various create event rules for each P&L row.
See Example 3 Override credit terms and taxes detail
In “Credit terms and taxes detail”, it is also possible to view the associated financial information (accounting model, credit terms, rates) for each individual P&L row; this information is very useful if the details window is opened after having selected more than one P&L row with different attributes.
The following “advanced” fields are visible by clicking on the attributes title bar
- Payment Calendar
- Splitting basis
these are used if the user wants to perform more complex operations, such as a daily split or a distribution of the amount to be collected/paid according to a certain weight/calendar
- Non-deductible percentage related to indirect tax policy 1
-
Other tax rate, to be managed if a second tax policy has been specified for the selected account
-
By accessing the menu Actions (
) > Override accounts , it is also possible to customise the Receivable/Payable Credit/Debit variation accounts, where the balance sheet contra-entry account, which must be adjusted and could be different from that prepared by default by the administrator and shown on the left, is overridden. The typical case is where all generic default costs adjust a generic trade payable, while for a specific entity the same account could adjust a specific payable, to professionals, for example.
The Events section displays the buttons for the events that are triggered by the accounting rule applied to the account and the “View Entries” button provides a preview of the double-entries by date, which will then be generated when the cash flow planning data process is launched.
The most common events that are associated with an account are billing and Collections and payment, in this case:
- by using the “Billing Line” button the entity manager can view and/or change the amounts related to the billing of the corresponding amounts for the period generated by the data process with information specifying the date on which the entries are created. If performed, this manual change entails a change to the overriding of the rule which becomes a “Manual rule”;
- by using the “Collections and Payments” button, the entity manager is able to view and/or change the collections and payments that were generated by the data process with information specifying the date on which the entries are generated. If performed, this manual change entails a change in the overriding of the credit terms which become “Manual credit terms”;
Once a rule or credit terms have been overridden, or events or collections and payments have been entered manually, it is possible to obtain a preview of the impact of these changes on the cash flows:
- by using the refresh key (above the chart) where the data from the chart and table below, summed up by month, are updated according to the rule that has been set
- by using the View Entries button, which displays the double entries to date (showing the relative event), which will then be generated when the cash flow planning data process is launched.
Example 1 Override all of a billing and credit terms rule
Suppose that there are two simulation years in the planning process (or there are two forecast scenarios associated with the process). The chart and the table display the data related to both years of the simulation. The Trade Revenue account has an accounting model that provides for the following events: accrual, accounting. For billing, the administrator has defined a bimonthly advance rule, VAT at 20% and 90 days credit terms.
Let us assume that the manager of Entity A00 wants to apply the following rules to the Software product family, to be valid for all simulation scenarios:
-
six-monthly advance billing
-
60 days credit terms
-
VAT always 20%
The entity manager can change the cash flow planning rules by accessing the CFP rules window by multi-selection in the P&L web window, or by selecting a cell from a web form containing the Software Family total.
In the attributes section, the user inserts only what he wants to override (with regard to the administrator’s settings) or the new rules in the “override all” field for the billing line and credit terms.
Example 2 Override credit terms for a scenario
After having managed the initial override at the global level in example 1 (valid for all scenarios), the entity manager wants to consider credit terms of 120 days for the second year only.
To override credit terms for a certain scenario only, the user can access the “Overrides for scenario” tab, where he inserts credit terms of 120 days for the second year only (1)
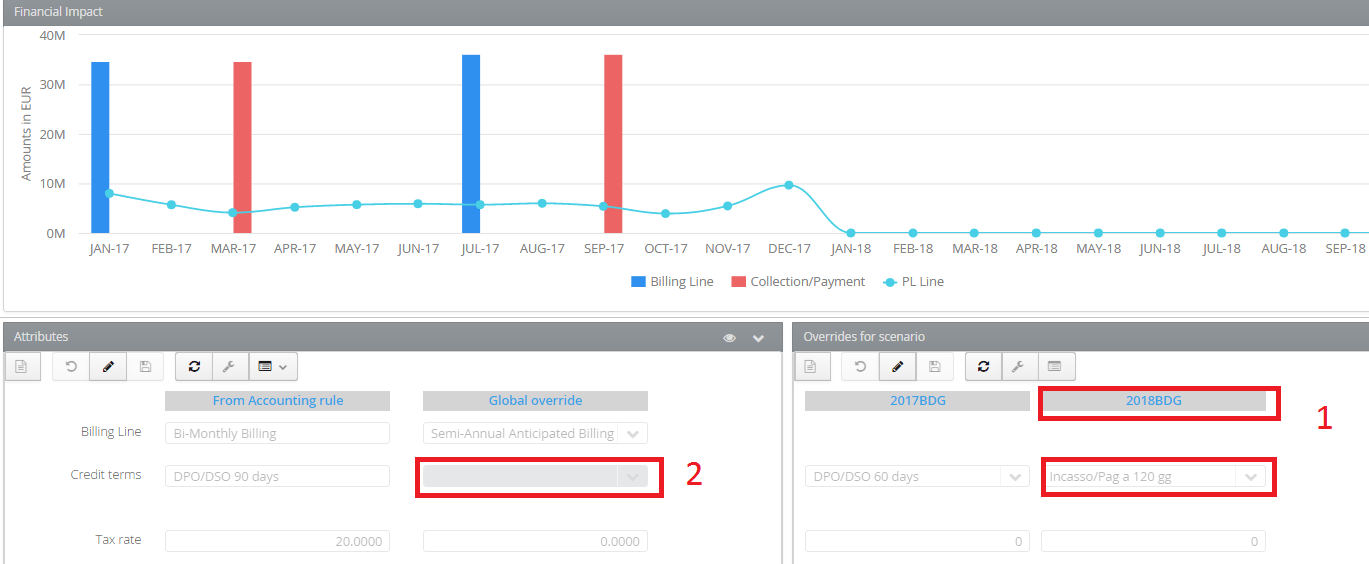
Note that the global override of the credit terms is no longer displayed (2) (the field is grey because there are different credit terms for the two scenarios).
The events rules cannot be overridden for the scenario; for example, in the above case the “six-monthly advance” billing rule is applied to all simulation scenarios (included between the calculation start date and the data process end date)
Example 3 Override credit terms and taxes detail
Let us suppose the user accesses the financial rules detail window, having selected the “Total revenues” account (which has several defined products). Let us also suppose that, in the accounting rules defined by the administrator, product 1 has credit terms of 60 days, product 2 has credit terms of 30 days and product 3 has credit terms of 45 days.
Let us assume that for entity A00, in the first year of the simulation, the user wants to set the following credit terms:
“total revenues” account - “all products” have credit terms of 60 days except for product 1 with credit terms of 30 days.
Once the total revenues account has been selected (from web form or by multi-selecting from the P&L window), in the attributes section the user can see that the credit terms cannot be viewed (grey field) because there are multiple credit terms within it (60, 30, 45)
To set the rule defined above, in the attributes section it is possible to enter “override all for scenario” at 60 days (which will have an impact on all rows of the “total revenues” account, and enter the individual exception of 30 days for product 1, by accessing the “Credit terms and taxes detail” window.